An example of V-Ray’s rendering power by Stefano Tsai. Images courtesy of Chaos Group.

Latest News
June 1, 2014
 An example of V-Ray’s rendering power by Stefano Tsai. Images courtesy of Chaos Group.
Chaos Group’s V-Ray ray tracing software is available for a number of applications including 3ds Max, Maya, Rhino, Sketch-up and Blender, in addition to a stand-alone form. I tried out the recently released 3ds Max version.
I wasn’t using the previous version of V-Ray with Max, so I can’t personally compare its render speed to 3.0’s, but anecdotal reports from forums as well as Chaos Group’s literature, indicate that the new version of V-Ray is significantly faster than its predecessor—by anywhere from 10 to several hundred percent.
Simplified User Interface
So what’s new with this version of V-Ray? First and foremost, there’s a somewhat simplified user interface. I admit that I only use 3ds Max periodically and usually find myself more than a little overwhelmed by the interface. Thankfully, the V-Ray part, at least, has gotten a bit easier to decipher and use.
For starters, there’s a new toolbar that gives you handy access to V-Ray’s options, lights, cameras, hair, materials and more.
The toolbar’s Quick Setup button provides one-click setup for Architectural exterior and interior scenes, VFX scenes and studio scenes, automatically setting the Global Illumination (GI), Shadow, and Anti-aliasing type and quality. The Studio setup, for example, selects for brute force plus light cached GI; architectural interior visualization selects for irradiance mapping plus light caching; architectural exteriors go for straight brute force. If you’re not sure what those mean, or why you would chose one over the other, then these quick settings are definitely for you.
You can further adjust the quality of the GI, shading and anti-aliasing from within the Quick Settings dialog with simple sliders.
If you go a little deeper into V-Ray’s setup, 3.0 still simplifies things for you a bit with Basic, Advanced and Expert modes. Basic and Advanced modes essentially hide varying numbers of settings from you in an effort to keep you from being overwhelmed by details.
Where the simplified user interface falls apart a little bit is in V-Ray’s documentation. The only documentation I can find is on Chaos Group’s website. And while it seems relatively complete, it’s basically non-searchable. Let’s say you read somewhere that V-Ray 3.0 supports Embree (a collection of ray tracing kernels developed by Intel and supported by many Intel processors.) How do you enable it? Searching on ‘Embree’ turns up nothing. To find the help, you have to first click on Plug-ins, then Renderer, then System. By the time you’ve made it that far, the documentation itself—which tells you that checking the Use Embree box enables the Intel Embree raycaster—is pretty pointless. It’s faster to just click on every single dialog and scan them for a “Use Embree” checkbox.
Progressive Rendering
The most outstanding toy in V-Ray 3.0 is its new progressive rendering engine. In the older, bucket-based rendering methods—which are still available—the image is divided up into chunks called “buckets” which are distributed to your various processor cores. Each bucket is rendered completely before that core moves on to the next one.
[gallery columns=“1” ids=”/article/wp-content/uploads/2014/06/car-before_opt620.jpeg|,/article/wp-content/uploads/2014/06/car-after_opt620.jpeg|V-Ray’s color corrections allow you to adjust the exposure, color balance and contrast of your renders without leaving the 3ds Max environment. The red car is the original render; the other car is the same render after adjustment in V-Ray’s Color Corrections dialog.”]
In a progressive render, it’s more like seeing the entire image rendered at once, but at very low resolution. The renderer then goes back over the scene, again and again, refining the render further with each subsequent pass. The effect is a bit like a fuzzy image slowly coming into focus.
You can set a maximum render time (or ‘quality’), and then interrupt at any point if the render looks adequate to you before that time expires.
Last Bucket Syndrome
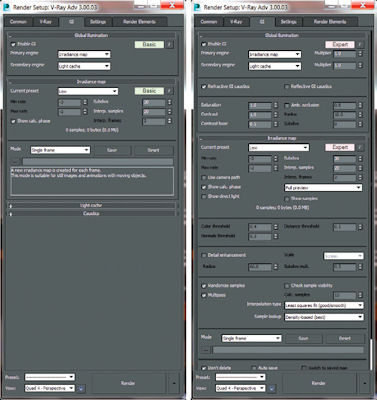 V-Ray simplifies things for you a bit with Basic (left), Advanced and Expert (right) modes, which hide or reveal settings to keep you from being overwhelmed by details.
Another nifty feature is 3.0’s Dynamic Bucket Splitting. This addresses a problem known as “Last Bucket Syndrome.” Oftentimes, at the very end of the render, you’ll be stuck waiting for one last bucket to render. In a beauty shot of a car, for example, it might be part of the headlight that, with all its varying transparencies, reflections and refractions, can bring the ray tracing process to its knees. So the entire render has finished … except for one corner of the headlight assembly, leaving all of your cores idle except the one working on that last, especially taxing section.
Dynamic Bucket Splitting breaks that last bucket down into two smaller buckets, or four, or eight, keeping all of your CPU cores busy and potentially significantly speeding up the render significantly.
The Masked Render
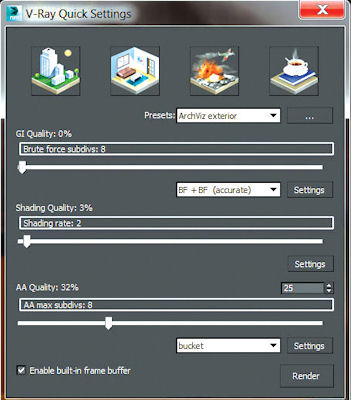 The tool bar’s Quick Setup button provides one-click setup for a variety of different scene types.
My personal favorite new feature is the Render Mask. You can now render selected parts of your scene based on object selection, layer, an include/exclude list, or a texture map. Why would you want to do that? Maybe you’re working on a render of a 1,000-part assembly and it’s looking pretty good … except for the aluminum texture on your bolts, which is still a bit off. So you tweak and re-render. Tweak and re-render. Tweak and re-render. It’s a familiar story to anyone who works with 3D design. There’s no reason, however, to re-render the entire scene—you really only want to check the texture on the bolts themselves.
The traditional way to handle this task is by defining a small rectangular region that includes a bolt or two and re-rendering only that chunk of the final image. That speeds things up a bit, and it’s still an option in V-Ray 3.0. But the easy to use new render mask is a much better option. Now, I can select a bolt (or several bolts, or everything with the bolt material) and tell V-Ray to use that selection as a mask. When I re-render, V-Ray only renders those bolts. The old render is intact (unless you’ve cleared the buffer) so you don’t wind up with a bunch of bolts floating in the ether, but rather a complete new render with newly textured bolts.
But Wait—There’s More!
V-Ray 3.0 has added what it calls comprehensive color corrections to the frame buffer, allowing you to adjust the exposure, color balance and contrast of your renders without leaving the 3ds Max environment. You can also assign a color profile such as ICC (International Color Consortium) and OpenColorIO.
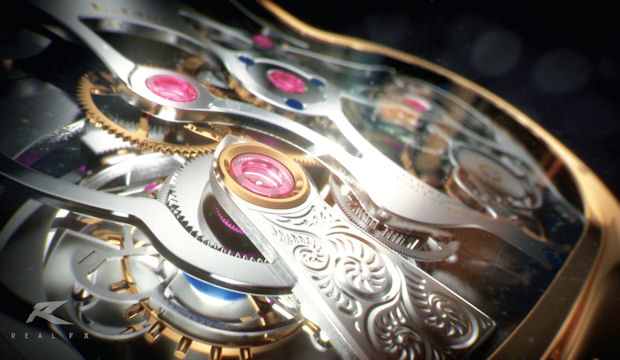 A V-Ray render of a watch’s inner workings by Real FX.
V-Ray has improved the way it renders with many, or very bright, light sources. Max Ray Intensity clamps secondary rays to eliminate noise and artifacts caused by very bright light sources. Probabilistic lights increase the render speed of scenes with large numbers of lights.
V-Ray’s improved subsurface scattering, used for rendering translucent materials, may be useful to some engineers. The improved skin material and faster hair and fur rendering … probably less so.
Check It Out
Despite welcome changes to simplify its interface, and the addition of progressive rendering, V-Ray is not as simple to use as programs such as Bunkspeed and Keyshot. If you’re not comfortable moving around within 3ds Max (or Maya, for which V-Ray 3.0 is also available) then you’re not going to be immediately comfortable rendering scenes with V-Ray.
Is V-Ray right for you? 3ds Max comes with several perfectly fine rendering engines right out of the box, including mental ray, iray, and Max’s default scanline renderer, but V-Ray’s combination of speed and sophisticated, realistic lighting and textures have won it a widespread community of ardent fans. If you’re curious to see why, you can download a free trial here.
More Info
Subscribe to our FREE magazine, FREE email newsletters or both!
Latest News
About the Author
Mark ClarksonContributing Editor Mark Clarkson is Digital Engineering’s expert in visualization, computer animation, and graphics. His newest book is Photoshop Elements by Example. Visit him on the web at MarkClarkson.com or send e-mail about this article to [email protected].
Follow DE