Reverse Engineering in a Digital World
Reinventing the wheel has become a whole lot easier.

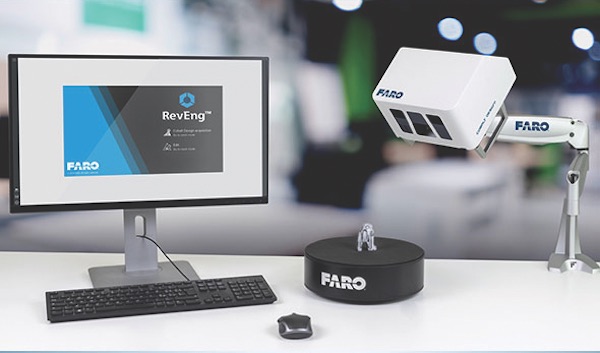
Technology like the new FARO Cobalt Design structured LED light scanner are ideal for reverse engineering small- and medium-sized products. Image courtesy of FARO Technologies.
Latest News
September 23, 2019
For as long as people have been inventing things, other people have been taking those inventions apart to see how they might replicate or improve them. There are many reasons to do so. Perhaps the original design needed a little help. Maybe the inventor is no longer available or went bankrupt, and left no drawings behind. The company making the product might have discontinued it, giving its loyal customers no other way to obtain replacement parts. Or maybe the materials, documentation, or technology used to make what would otherwise be a viable product no longer exists, forcing those desiring said product to undertake a lengthy design and manufacturing reboot.
Connecting the Dots
Whatever the need, reverse engineering has long been a painstaking process. Parts must be carefully measured, their physical features and dimensions transferred to a CAD system, and a 3D representation of the target workpiece constructed. Coordinate measuring machines (CMMs) like those found in machine shops make the measurement part of this task a bit easier, but these devices are often expensive, and are primarily designed for quality management rather than reverse engineering.

This is especially true where three-dimensional curved surfaces and free-form shapes are present, as these might require the collection of hundreds or even thousands of individual data points in order to reconstruct the target geometry. It’s for these reasons among others that reverse engineering has a well-deserved reputation as a costly, often error-prone process requiring great skill and no small amount of fortitude.
That is, until recently. Thanks to the work of 3D measurement, imaging, and realization provider FARO Technologies Inc., Lake Mary, Fla., reverse engineering even the most complex workpieces has become much faster and more intuitive.
Beautiful Music
Consider a violin. Its gently curving top and back plates, the saddle and end blocks, the outer ribs holding it all together—how would anyone go about measuring such an intricate and delicate musical instrument, let alone reverse engineering it? Now consider a violin from the 1730s, one that Mozart might have practiced on as a child?
This was the challenge facing FARO engineers several years ago when twenty such violins—each valued at millions of dollars—arrived at their door, together with a request from their owners: help us to understand what makes these works of art tick.
Using a FARO Portable Coordinate Measuring Machine (PCCM) equipped with a non-contact Laser Line Probe (LLP), the engineer built a “point cloud” of the violin’s exterior (accurate to a human hair (0.003”) thickness), then fed that data to the company’s 3D scanning software. Because no one was willing to cut apart a $2M violin, there was no way to measure the inside, but an MRI scan at an area hospital supplied that part of the necessary information. The two files were merged, a little cleanup work performed, and voilà—a dimensionally accurate 3D model that took only 45 minutes to build – less time than needed to play Mozart’s Requiem Mass.
Mammoth Ideas
Mammoth Machine + Design, Huntersville, N.C., also uses a FARO arm for reverse engineering, although its projects are considerably less musical. George Brinzey, co-founder and director of business development offered one recent example, a 2000-amp circuit breaker for a nearby manufacturing facility. After repeated failures that shut the production line down for up to ten hours at a time, the facilities director asked Mammoth if they could replicate the breaker, but eliminate the “cheap plastic parts” within while doing so. Brinzey and his team scanned the breaker, imported the results into their engineering software, 3D-printed several prototypes, then machined the finished components out of 6061 aluminum.
In another example, Brinzey and CEO Ali Bahar were approached by a manufacturer of plastic-injection molded parts for the food industry. When one of the carrier pallets on a critical forming machine caught fire, the company was facing more than three months of downtime and “huge expedite costs” for a replacement. Mammoth agreed to scan the burned pallet and machine a new one, getting their customer up and running the very next day. “We not only use the FARO arm to 3D-model damaged or faulty components, but also use it to measure the machined or 3D-printed replacements and verify that they fit correctly within the assembly,” Bahar said. “In our digital thread of manufacturing, everything starts and ends with the arm.”

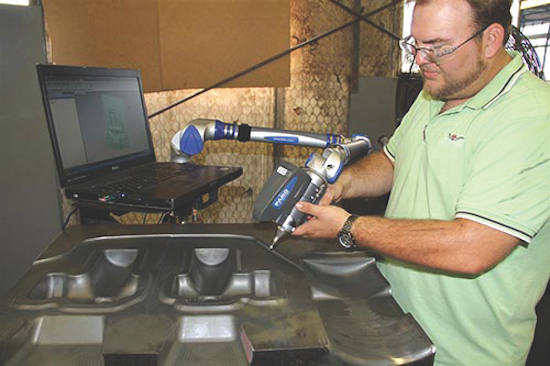
They’re not alone. Mansfield, Texas-based Trinity Forge enjoyed similar success using one of FARO’s ScanArms and Geomagic Studio/Qualify 12 software to reverse-engineer massive forging dies, some weighing up to 4000 pounds. Rather than the time-consuming legacy process of pouring a plaster cast, waiting for it to dry, and then measuring it on the shop’s CMM, workers can now scan and model a die in about 1-1/2 hours, easily half the time as previous methods.
Perhaps more importantly, the system is so user-friendly that workers use it to proactively measure tools for wear, thus improving part quality. And because they now have a 3D model that can easily be imported into the shop’s CAM software, they’re able to make customer-requested mold modifications on CNC equipment rather than the manual machine tools used previously. The result? Greater customer satisfaction, lower costs, and less risk of scrapping an expensive die.
Replicating Reality
If you’re thinking you’d like to 3D-scan your own parts, or build a business on reverse engineering like Mammoth did, there are several ways to go about it. The process itself isn’t all that different than described at the start of this article, in that you must first gather dimensional and geometric data about the target workpiece, and then convert that data into a CAD representation of the workpiece. What has changed, however, is the ease with which this can be accomplished.
Photogrammetry is one option. If you’ve seen those cool 3D-representations in Google Earth of the Eiffel Tower or Hoover Dam, you already have an idea of what’s possible. In fact, all you really need for some basic “image-based modeling” is a smart phone, a set of reference targets (for scale), and some photogrammetry software to stitch together the photos of whatever you wish to reverse engineer. It will be nowhere near accurate enough for an engine block, say, or any of the mechanical components that go inside it, but you could probably get a decent model of the kitchen table. Granted, industrial-grade photogrammetry is far more accurate, but still falls short for the type of work discussed here.
You might also talk the local hospital (or a commercial facility) into CT or MRI-scanning your parts, but these machines are extremely expensive and, despite their spectacular imaging capabilities, not designed for industrial applications. A better option for most applications is a light-based scanning system. Two types are available—laser line and structured light scanners. Both use sensors to detect reflected light and trigonometric triangulation to calculate an object’s shape and position, but the similarities end there.
Laser line scanners, for instance, are often mounted on the end of an arm (as in the previous two customer examples) and can be combined with a physical probe to augment their measuring capabilities. Single beam or multiple beam versions are available, as are tripod-mounted systems. These devices are quite easy to use, relatively inexpensive, and are largely unaffected by ambient light. They’re also accurate enough for the lion’s share of all industrial applications.
Structured light scanners, on the other hand, shower the workpiece with white or blue LED light. It’s for this reason that transparent or highly reflective objects can be challenging to measure, especially where white light is concerned, although coating the surfaces with an opaque material before scanning eliminates this problem. They are typically automated, quite fast, and offer high resolution and accuracy. And depending on the size and number of cameras, they can be a bit more expensive than laser line scanners. That said, both are widely used in the automotive, aerospace, and defense industries, or for general manufacturing where a cost-effective and easy-to-use measuring solution is needed.
Clean, Dry, no Spy
Someone who knows all about laser scanning is Bob Coulter, director of Data Acquisitions and Technology at Transhield Inc., an “advanced protective cover technology” provider in Elkhart, Ind. The company’s products include custom-fit fabric and plastic covers for aircraft engines, recreational vehicles, boats and tractor trailers, heat exchangers and other industrial machinery, and especially military equipment, the owners of which have zero tolerance for corrosion, dirt, and prying eyes during storage.
Shortly after joining the company, Coulter was charged with modernizing the company’s decades-old process of hand-patterning, starting with a mission-critical cover for the nation’s Blackhawk helicopter fleet. Based on his previous experience in the automotive racing industry, he knew laser scanning was the answer, and turned to a FARO Focus3D X 130 Laser Scanner from FARO as a key component of the new process.
The results were impressive. Thanks to the portable scanning system’s ability to capture up to 978,000 points per second at a range of 130 meters (426 ft.), a single Transhield technician can now accurately scan most objects within 20 minutes, compared to hours of onsite work by a skilled team. “It’s opened up the opportunity to go deeper in the industrial world and cover objects that previously would have taken a long time and a lot of money to pattern,” said Coulter.
Fast Scans, Fast Cars
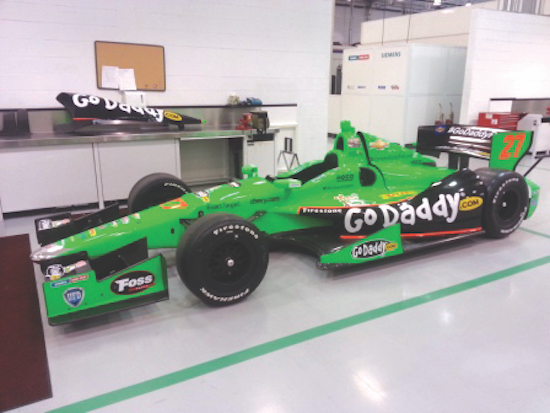
A similar story comes from Andretti Green Racing (AGR) in Indianapolis, which also needs to scan motor vehicles. The difference is that these vehicles aren't sitting in storage somewhere, but rather screaming down a racetrack at hundreds of miles per hour. In order ot build fast cars, though, AGR needed an equally speedy way to measure them, something their third-party service provider was unable to do. Enter FARO's Laser ScanArm, one with a full 8-foot measuring span that was soon loppping off several days per scanning project.

According to AGR technical director Tino Belli, the FARO system paid for itself within months, but the ability to quickly and easily perform in-house surface scanning gave the team something much more valuable: access to structural data they would otherwise have lacked, data that has in turn made them more competitive. “If we can increase the consistency of our race cars, we can learn faster, and the faster we learn, the better our chances of winning,” he said. “FARO is a part of that.”
Best in Class
FARO recently made a good thing even better with its new Cobalt Design structured LED light scanner, introduced in July of 2019. Designed specifically for accurate color scans of complex, often organic shapes, the white light system boasts a dedicated onboard processor (an industry first), 5-megapixel stereo cameras, and can be configured with multiple scanning heads that are able to work independently or as a team. This makes the Cobalt Design system ideal for reverse engineering of small to medium-sized products, packaging and fashion design, as well as in-process measurement of machined or injection-molded parts.
It’s also easier to use, thanks in large part to another recent introduction, FARO’s RevEng software. Users can configure scan parameters once at the start of a project, and with a push of a button, apply the same values to other similarly-shaped objects. The system also comes loaded with pre-configured scan and mesh settings for faster setups, an integrated rotational axis for full-field scanning, and the ability to capture “millions of 3D measurement points in as little as one second with up to 3.1-megapixel accuracy,” said Thorsten Brecht, FARO senior director of 3D Design.
It should be clear by now that FARO’s ScanArm and structured light scanning systems are an excellent way to increase the efficiency of any reverse engineering project, but are also quite suitable for in-process measurement, process validation, and more. They’re accurate, easy to use, offer excellent value, and have been game-changers for the companies discussed here as well as many others. If you’re ready for a painless way to improve your engineering, design, and manufacturing processes, give them a call.
More FARO Technologies Coverage
Subscribe to our FREE magazine, FREE email newsletters or both!
Latest News


