Editor’s Pick: Aircraft Surface Inspection Solution Launches

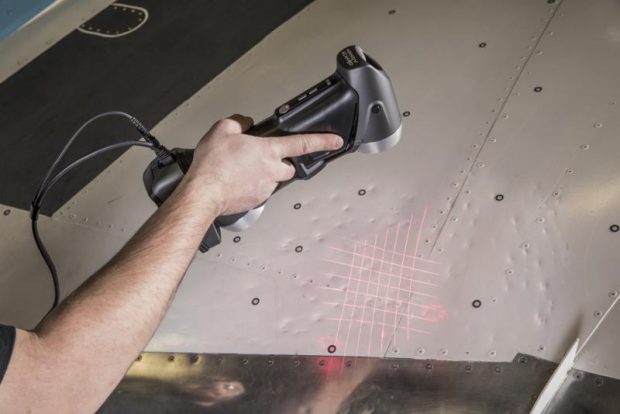
The SmartDENT 3D aircraft surface inspection and damage assessment software pairs with Creaform’s HandySCAN 3D portable scanner to provide a non-destructive testing solution for airlines and maintenance, repair and overhaul service companies. Image courtesy of Creaform Inc.
Latest News
November 8, 2017
 Dear DE Reader:
An old buddy of mine owns and operates an air flight charter company that limos celebrities, political figures and the well-heeled all over North and Central America. A former combat pilot, he’s a stickler for safety. He spends an enormous amount of time on aircraft inspection, maintenance and repair. Today’s Editor’s Pick of the Week could save him some time and effort.
Creaform recently launched a software tool for maintenance, repair and overhaul (MRO) service outfits called SmartDENT 3D. It works in combination with the company’s HandySCAN 3D metrology-grade portable laser scanner. Together, they create an aircraft surface inspection and damage assessment system that looks pretty neat and efficient. On a side note, the SmartDENT 3D can be used to measure the effects of corrosion as well as dents.
 The SmartDENT 3D aircraft surface inspection and damage assessment software pairs with Creaform’s HandySCAN 3D portable scanner to provide a non-destructive testing solution for airlines and maintenance, repair and overhaul service companies. Image courtesy of Creaform Inc.
Creaform says that the software is designed to simplify measurement extraction of 3D scanning data so that you get the dimensions required for in-service aircraft assessment. Judging by the quick video linked off of today’s main write-up that seems a fair statement.
For one, SmartDENT 3D doesn’t require that you have guru-level smarts in metrology software or complex 3D data acquisition and handling either. It presents a graphical interface with a guided workflow.
Secondly, the SmartDENT 3D and HandySCAN 3D workflow appears as simple as three steps: scan, analyze and report. It provides localization automatically, and SmartDENT 3D creates your reports on-site in real time. And it doesn’t seem to be fussy about the kinds of measurements you’re after — length and width of dent damages, maximum depth, closest internal structure, maximum depth of dent to closest internal structure and so on.
The HandySCAN 3D laser scanner, which comes in two models, is hand-held. It weighs a titch over two pounds, so using it shouldn’t fatigue your arm. It scans an area as large as 10.8 x 9.8 in. with a speed up to 480,000 measurements per second, depending on model. Accuracy is up to 0.0012 in. and resolution is up to 0.002 in.
All in all, a pocket pit gauge may be lighter, but the speed and accuracy of the SmartDENT 3D-HandySCAN 3D technique should be infinitely faster and, when you cipher in all that on-site reporting, more convenient. To learn more about SmartDENT 3D and the HandySCAN 3D solution, hit today’s Editor’s Pick of the Week link. Make sure to take in the video linked at the end. It’s worth seeing.
Thanks, Pal. – Lockwood
Anthony J. Lockwood
Editor at Large, DE
Subscribe to our FREE magazine, FREE email newsletters or both!
Latest News
About the Author
Anthony J. Lockwood is Digital Engineering’s founding editor. He is now retired. Contact him via [email protected].
Follow DE


