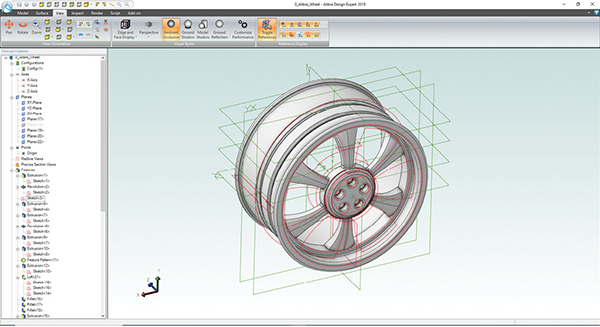
Alibre Design 2019 features a well-designed interface and easy-to-use tools. As you sketch and add features, each appears in the history tree located within the Design Explorer panel on the left. Images courtesy of David Cohn.
Latest News
November 1, 2019
With its launch in 2000—long before Onshape and others popularized browser-based CAD—Alibre Design became the world’s first browser-based distributed 3D CAD program, enabling multiple users to work on the same design simultaneously via the internet. The company even received a patent protecting its technologies for generating 3D geometries across a high-bandwidth, distributed network.
Alibre Design was not only ahead of its time, but it also set a new price point of $495 to $995 for an annual subscription. In 2009, then CEO Paul Grayson dropped the price even further, offering a $99 version for a limited time.
Built on the ACIS modeling kernel and a 2D constraint system from Siemens, Alibre helped users to create parametric solid models driven by intelligent dimensions. Although the program has been continuously updated since its launch nearly 20 years ago, there were some bumps along the way.
3D Systems acquired the company in 2011, and Alibre Design morphed into a new product called Geomagic Design, part of the 3D Systems product portfolio. But in 2017, a group of former Alibre veterans, led by Max Freeman—former VP of product management and marketing at the old Alibre, Inc.— reacquired the code and formed Alibre, LLC (see DE, March 2018).
Alibre Design 2018, unveiled last year, marked the first release since the company returned to private ownership. Earlier this year, Alibre LLC launched Alibre Design 2019.
Easily Understandable Interface
Alibre Design should feel quite familiar to anyone who has worked with a parametric 3D modeling program. The software initially opens to a Home window. From here, you can open existing models or start a new one. You can also explore tutorials, training videos and sample exercises as well as an online knowledge base and user forums. Other tools let you access system options, manage your license and check for updates. Once you start working in Alibre Design, you open one of the program’s six workspaces.
You can create Parts in the Part workspace. You begin with a closed 2D sketch that is turned into a 3D feature by extruding, lofting, revolving and sweeping. You can then select a plane or planar face, sketch another profile and add or remove material. Rather than constantly going back to the ribbon as you work, you can press the spacebar to access a context-sensitive menu or right-click to display shortcut menus.
When creating features, most tools open dialog boxes where you specify parameters and enter values controlling the creation of the feature. Sheet metal parts are created the same way, except that within the Sheet Metal workspace, you use sheet metal-specific features—such as cuts, dimples, flanges and tabs—to add or subtract material from the model.
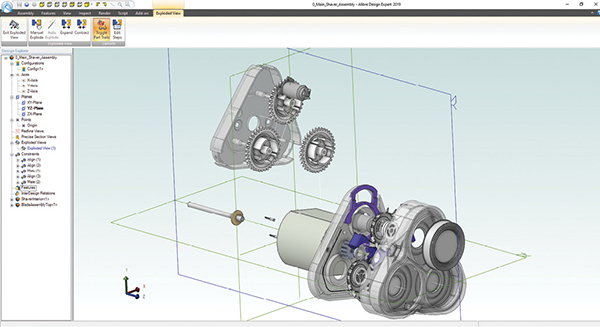
Once you create and save files, you work in the Assembly workspace to link parts, sheet metal parts or other assemblies into an assembly, using assembly constraints to mate and align components.
In the Bill of Materials (BOM) workspace, you can generate BOMs that show information about the various files that comprise the assembly. As the final step in the design process, you move into the 2D Drawing workspace, inserting parts or assemblies to create standard orthographic, 3D and engineering views to which you then add dimensions and notes to document your designs. Because the software is parametric, any change made to any file within the design is automatically reflected in all the assemblies, BOMs and drawings that reference that file.
There is also a Global Parameters workspace, which serves as a central repository of variables, equations and values that you can use across multiple parts and assemblies. This workspace looks similar to the Equation Editor found in the Part, Sheet Metal and Assembly workspaces. The primary difference is that the Global Parameters can be used between files, whereas the Equation Editor is restricted to a single file.
All six workspaces have a well-designed, common look and feel. With the exception of the BOM workspace, each includes a large work area with a ribbon across the top. Ribbon-based tools are organized into clearly labeled panels. Tool icons are easy to identify, with identification further aided by tooltips that appear whenever you hover the cursor over a button. When you activate a tool, prompts appear at the bottom of the screen.
The Part, Sheet Metal and Assembly workspaces also have a Design Explorer panel attached on the left. Here, you can access axes and planes. As you create features, they are added to the feature tree, which also appears in this panel. And as you’d expect, you can roll the history back to any point and reorder features in the tree. Clicking a program icon in the upper left of every workspace lets you quickly access common functions like save and open, and access system preferences.
What’s New
Alibre Design has long been able to open files created in other CAD programs, including AutoCAD, Catia, Inventor, ProE, Rhino and Solid Edge, and can export to ACIS, IGES, Parasolid, STEP and STL.
Alibre Design 2019 features new file translators for every file type supported by Alibre. The new release also fixes some STEP import bugs. But support for SolidWorks export has been removed, although SolidWorks import remains available. Support for STEP 242, NX and JT file formats has also been added.
Alibre now performs anti-aliasing for 3D and 2D, resulting in more realistic visuals and crisper text. The new release also supports ambient occlusion, model shadows, ground shadows and ground reflections. There are new silhouette edge and illustration view modes, letting you create views suitable for documentation while working in the 3D model.
Alibre Design 2019 offers a new type of interactive section view. You can create up to three simultaneous section planes that you can drag in real time. The new release also includes an integrated PDF engine, enabling you to create high-quality 2D and 3D PDF files. In addition, line weights are now shown in real time in the 2D workspace, so you no longer need to do a Print Preview to visualize the results.
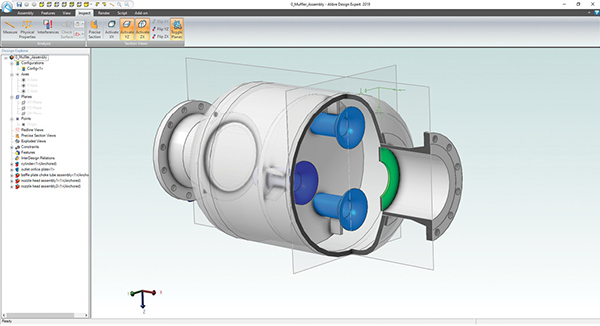
Finally, the new release includes a host of bug fixes as well as a suite of new options that leverage the power of advanced graphics boards, improving performance when working with large models.
Licensing Options
Alibre sells two different versions of its software aimed at designers, engineers and machinists: Alibre Design Professional and Alibre Design Expert.
In 2018, the company also launched a new product—Alibre Atom3D—focused on consumer and enthusiast end users. Although similar to the former Alibre Design Personal Edition, it does offer a different feature set than had been available in that product. With the transition from 3D Systems, Alibre also dropped its 3D print analysis feature and removed the ability to import, view or use mesh files.
Alibre Design Professional includes all the tools you need for modeling solid parts, creating assemblies, producing drawings and BOMs.
Alibre Design Expert then adds global design variables, support for surface creation, sheet metal modeling, assembly-level features, model simplification and design variants, as well as includes a copy of KeyShot for creating renderings of your 3D models. The ability to import from Inventor, Creo, CATIA and Solid Edge, and to export to SolidWorks and Parasolid, is also only available in the Expert version.
In an interesting twist, Alibre is no longer a subscription-based product. With most major CAD vendors having moved to a subscription model, Alibre has gone the opposite way, selling Alibre Design as a perpetual license. So, rather than paying monthly or yearly fees, you can pay once and then use it forever, although there is an optional yearly maintenance fee.
There are also several licensing options. With a regular license, you can put the software on as many computers as you want but must release the license from one before you can activate the software on another machine. Internet access is required to license and unlicense machines. Those who switch computers often can pay a one-time fee of $200 for a regular license mobility upgrade. This automates the process of unlicensing one computer and then licensing the other but requires consistent internet access.
An offline license is available for those companies or individuals that have security requirements that prevent internet access. Some license-related information must be exchanged with Alibre during initial licensing, but does not require a live internet connection.
Companies with strict security requirements and fluid usage requirements can purchase a local network license, which provides the flexibility of concurrent licensing with the security of offline licensing. You deploy your own license server. When someone starts the software, a license is automatically taken from a pool of available licenses.
You can download a 30-day free trial from the Alibre website. The company also offers PDF-based exercise guides for basic part and assembly modeling as well as an introduction to the Alibre Script interface. There are also a number of videos available that demonstrate how to create solid and sheet metal parts, create assemblies and generate 2D drawings and BOMs.
Although not as powerful as Catia, Creo, Inventor, Solid Edge or SolidWorks, Alibre Design has a lot going for it, particularly its affordability and ease of use. It may be nearly 20 years old, but it still looks and feels pretty fresh.
Subscribe to our FREE magazine, FREE email newsletters or both!
Latest News
About the Author
David Cohn is a consultant and technical writer based in Bellingham, WA, and has been benchmarking PCs since 1984. He is a Contributing Editor to Digital Engineering, the former senior content manager at 4D Technologies, and the author of more than a dozen books. Email at [email protected] or visit his website at www.dscohn.com.
Follow DERelated Topics
