Take Multiple 3D Scans Simultaneously

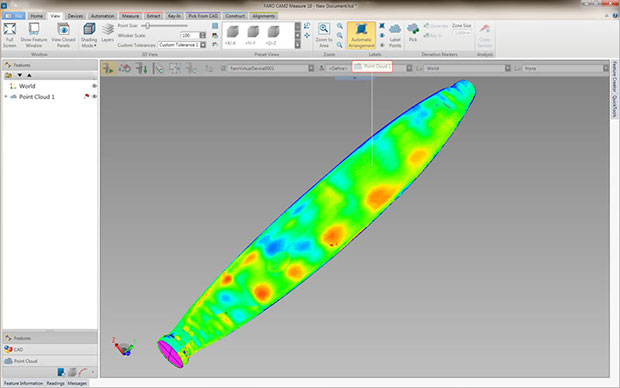
CAM2 Measure’s Live Color Scan functionality offers users immediate feedback using color deviations from the CAD model during the scanning process, which can help you identify inconsistencies. Image courtesy of FARO Technologies Inc.
Latest News
July 22, 2015
FARO Technologies Inc., a developer of 3D measurement, imaging and realization technology, has released CAM2 Measure 10.5, the latest edition of its all-in-one 3D metrology software for its FaroArm portable 3D measurement arm, FARO ScanArm contact/non-contact portable measurement system and its FARO Laser Tracker large-volume 3D measurement system. Version 10.5, says the company, delivers increased productivity with simultaneous 3D measurement capabilities.
By labeling the platform as all-in-one, FARO means that CAM2 Measure provides a single, complete solution for tactile measurement and non-contact 3D scanning applications. Features include image-guided measurement, automatic nominal association to various features and live feedback during measurements. CAM2 Measure also comes with a CAD import tool that increases users’ ability to load a large amount of CAD data, the company states.
 FARO Technologies says that version 10.5 of its CAM2 Measure 3D metrology software now provides users with the ability to simultaneously scan from multiple 3D measuring devices into a single seat of software running on one computer. Image courtesy of FARO Technologies Inc.
With CAM2 Measure 10.5, users now can connect multiple 3D measurement devices within the same coordinate system and then simultaneously scan from each into a single seat of software on one computer. This capability, explains FARO, enables users to seamlessly scan large objects with higher speed and greater accuracy as well as complete 3D scanning jobs faster. This expanded point cloud capacity, FARO reports, means that you now are able to collect over 20 times more data than previous versions of CAM2 Measure while maintaining accelerated processing speeds.
CAM2 Measure’s GD&T (geometric dimensioning and tolerancing) functionality has been enhanced in version 10.5 to provide streamlined analysis and visual reporting. Users can now display a part inspection just like a print, which makes it easier to visualize and determine part quality, according to the company. This enhanced functionality also eliminates the need to look at each feature in sequence to determine part quality.
 The enhanced GD&T (geometric dimensioning and tolerancing) functionality in CAM2 Measure 10.5 provides users with streamlined analysis and visual reporting. Image courtesy of FARO Technologies Inc.
Workflow enhancements in CAM2 Measure 10.5 include the ability to automate repeat inspections by programing data analysis to occur automatically after you take measurements. This new capability, FARO adds, reduces required training time, the risk of operator error and accelerates job completion times.
CAM2 Measure 10.5 also has new capabilities that allow trim edges on materials such as sheet metal to be easily scanned, which, says FARO, essentially eliminates the need to collect hard-probed measurements on part edges.
“The capability to connect multiple devices for simultaneous 3D scanning, automating repeat inspections and enhanced GD&T functionality represent major advancements in our metrology software,” said Kathleen J. Hall, FARO Technologies’ senior vice president and managing director – Americas, in a press statement. “The new CAM2 Measure 10.5 provides significant advancements that support our customers’ needs to measure faster and more efficiently with improved ease-of-use.”
FARO CAM2 Measure runs on Windows-based systems. For further details on CAM2 Measure 10.5, click here.
Watch a video and learn more about CAM2 Measure 10.5’s simultaneous measurement capabilities.
Download the CAM2 Measure 10.5 data sheet.
Click here for more details on the FaroArm portable 3D measurement arm.
Click here for more details on the FARO ScanArm contact/non-contact portable measurement system.
Click here for more details on the FARO Laser Tracker large-volume 3D measurement system.
Check out what’s happening in 3D measurement technology in FARO’s 3D blog.
See why DE‘s editors selected CAM2 Measure 10.5 from FARO Technologies as their Pick of the Week.
Sources: Press materials received from the company and additional information gleaned from the company’s website.
Subscribe to our FREE magazine, FREE email newsletters or both!
Latest News
About the Author
Anthony J. Lockwood is Digital Engineering’s founding editor. He is now retired. Contact him via [email protected].
Follow DE


