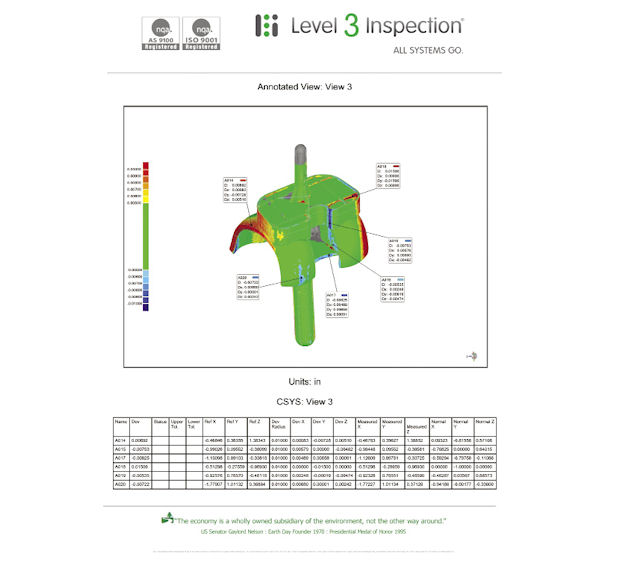
An annotated page from Level 3 Inspection’s report on comparing an as-built orthopedic knee implant and the intended design. Images courtesy of Level 3 Inspection.
Latest News
May 1, 2014
 An annotated page from Level 3 Inspection’s report on comparing an as-built orthopedic knee implant and the intended design. Images courtesy of Level 3 Inspection.
About 5 years ago, Bill Greene and his colleagues at Level 3 Inspection (L3I) foresaw the need for precision 3D scanning and inspection in orthopedic implant manufacturing. So they opened an office to offer professional computer-aided inspection services in Warsaw, IN, known as the Orthopedics Capital of the World. The city owes its nickname to Revra DePuy, an early orthopedic appliance manufacturer who left his indelible mark there. Now, other industry leaders like Biomet, Zimmer, Medtronic and their supply chain partners are also part of the city’s economic landscape.
L3I is first and foremost a digital inspection service provider. Its bread and butter come from precision manufacturers who need to verify that the parts built conform to the design specified. To accomplish this, clients usually contract L3I to scan the part produced in the manufacturing facility, then compare the high-resolution digital scan to the original CAD geometry.
For all intents and purposes, L3I’s services seem like a perfect match for improving the quality of braces and implants commonly used in the orthopedic profession. Considering how costly a recall is for the manufacturer—and how devastating it is for the patient—the industry could clearly benefit from greater quality assurance.
But at the onset, Greene didn’t realize there was a fundamental difference that separates aerospace and automotive manufacturers from their orthopedic counterparts. “[Orthopedic manufacturers] love the result, but just aren’t comfortable outsourcing the job,” he reports. “They’d much rather buy the equipment and bring the operation in-house.”
So, instead of combatting the prevalent culture and tradition in orthopedics, Greene decided to adapt. L3I invented and applied for an international patent for an integrated, automated system that would perform the same computerized inspection operations, but could be used by a nontechnical operator. Thus, the Smart Inspection Station (SIS) was born.
Services vs. Automation
Since it was founded in 2008, L3I has scanned more than 4,000 precision manufactured parts projects, ranging from the unusual to run-of-the-mill mechanical parts. The staff has scanned an actual rose for an artist who wanted to reproduce it at 500 times’ scale. They have scanned a house-arrest ankle bracelet for an attorney who needed to prove the device showed no evidence of tampering by his client (the outcome could determine whether the attorney’s client would remain in solitary confinement or be sent back to the relative comfort of house arrest). They have certainly scanned more than their fair share of turbine jet engine parts.
L3I’s technology is certified to meet ISO’s AS9100/ISO9001 Quality Specification standard, and the company recently secured its ISO 17025 accreditation, which includes a proficiency test. To begin the process, Greene and his colleagues scan the part in a high-resolution white light scanner to within 2-micron accuracy (or within 0.000078 in.). Then they transform the point clouds into a polygonized-mesh (.STL format) file for analysis, inspection and reporting in Geomagic Control (formerly Geomagic Qualify), a metrology software solution. According to Geomagic, the software gives users “the highest accuracy, speed, and comprehensive, automated reporting on the quality of as-built parts for first-article inspection, production inspection, and supplier management using computer measuring machines and 3D scanning tools.”
On a typical contract job, Greene and his colleagues would scan the part, align the scanned results to the CAD data in Geomagic Control to identify the deviations, then proceed to extract all of the dimensions from the blueprint and generate extensive reports in Microsoft Excel and Adobe Acrobat. The analysis results are presented to the customer via secure FTP in a portfolio of PDF and spreadsheet reports. “On complex parts, that report can be 300 to 400 pages—often over 30MBs of information,” Greene says.
In the SIS, the same scanning, inspection and reporting process is completely automated. “We program the supercomputer in the SIS to collect the scan file, align the scan file to the CAD model, generate a color plot, extract the dimensions from the blueprint, and populate the spreadsheet and PDF reports—all completed automatically,” Greene explains. “It’s really become the Answer Machine for precision parts’ dimensional-quality inspection.”
The SIS, roughly the size of a small refrigerator, consists of a scanner, a robotic controller, Geomagic Control software and proprietary firmware. The system is provided with a support contract, which includes training and technical support. “We actually program the system to inspect the [client’s] part numbers,” says Greene. “We can do that offline because we have replicate systems in our facility. Once the program is ready for final testing, we download it to the SIS over the Internet.”
With manual scanning equipment (also available from L3I), the user must manually reposition the part several times to expose all surfaces of the part to the 3D camera’s field of view; in SIS’ automated process, however, the part rotation is a computer-controlled robotic operation, yielding speed and throughput.
“Geomagic has been a long-term good partner,” Greene says. “We’ve developed our system using Geomagic Control as the analysis engine. We’re very excited about our partnership, as more precision manufacturers want these fast, reliable results.”
Hobbyist vs. Professional Markets
Greene sees the increased consumer use of 3D printing in the hobbyist market, coupled with some pioneering attempts to use mobile phone apps for 3D scanning, not as a threat but as an encouraging sign. The trends point to rising consumer interest in low-res scanning that can raise awareness of the professional market for high-res scanning—L3I’s domain.
 The Smart Inspection Station, an automated computer-aided inspection unit from Level 3 Inspection. Image courtesy of Level 3 Inspection.
“Most products and methods in the market are 200 times less accurate [than L3I’s technology],” he says. In addition to the accuracy of their process, he says the staff at L3I adds value because they are “master practitioners and can readily recommend how to solve manufacturing problems when they are discovered.”
Almost half of L3I’s staff is made up of former Pratt & Whitney and other aerospace engineers, according to Greene. Greene is himself a metallurgical engineer with experience in the aerospace industry. That domain expertise allows them to interpret the scanned results correctly and compare them to the designer’s intent and reference files, as captured in the CAD geometry and blueprint.
“We know how the scanner and the software work together in our process—in many cases, even better than those who created the scanner and the software,” Greene says, noting that anyone can purchase a scanner and the inspection software, but just being able to evaluate the scanner output file and the CAD geometry in the inspection software doesn’t give you the answer you need.
“You’ll be hundreds or many thousands of button clicks away from getting the dimensional-quality answer you want, and to understand the difference between the measured part and the designer’s intent,” he points out.
Ease of Use
The SIS is the encapsulation of L3I’s knowledge and processes, so you can get the answer you need in 10 minutes without technical expertise, according to Greene. That ease-of-use is especially important to precision manufacturing professionals, since scanning and running inspection software is not their core competency or main responsibility.
There is no limitation to the part size, the material of construction, the surface finish or the shape that can be inspected by L3I’s technology—except for line of sight, because the process is stereo digitizing. Greene recalls one of the smallest objects his firm has ever been asked to scan. It was a dental piece made from investment cast ceramic, measuring “smaller than one-third the size of an uncooked grain of rice,” he estimates. Greene put up the scanned results in 3D—defined with 800,000 data points—on an oversized monitor so its details could be inspected from every imaginable angle. He was delighted to see the jaw-dropping reaction of his client.
More Info
Subscribe to our FREE magazine, FREE email newsletters or both!
Latest News
About the Author
Kenneth Wong is Digital Engineering’s resident blogger and senior editor. Email him at [email protected] or share your thoughts on this article at digitaleng.news/facebook.
Follow DE


