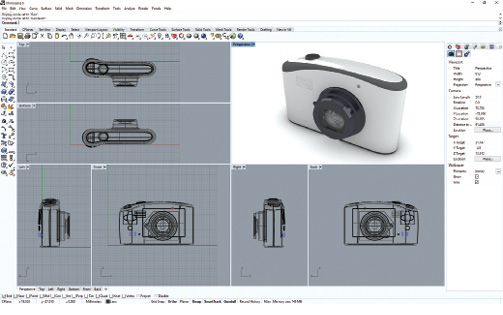
The Rhino interface features a menu, command line and toolbar groups across the top, a toolbar on the left and panels on the right. The screen is initially divided into four viewports that can be further subdivided and resized. Images courtesy of David Cohn.
Latest News
July 1, 2019
Since its initial release at SIGGRAPH in 1998, Rhinoceros—or, more commonly, Rhino or Rhino3D—has won a very loyal following. The program can create, edit, analyze, document, render, animate and translate Non-Uniform Rational B-Spline (NURBS) curves, surfaces, solids, point clouds and polygon meshes.
Primarily a surface modeler, but with many related features, Rhino is developed by Robert McNeel & Associates. The software evolved from a 1992 program called Sculptura. From its inception, Rhino was designed to be easy to learn, easy to use, low-cost and extensible.
Like AutoCAD, Rhino has always featured a command line where users can type commands. Geometry in Rhino is based on the NURBS mathematical model. As such, Rhino allows users to start with a simple sketch and generate complex 3D shapes—virtually any shape imaginable. Always affordable, Rhino today costs just $995 (or $195 for a student version).
And like AutoCAD, users and third-party developers can create add-ons to extend the power of Rhino. McNeel offers several such add-ons, including Flamingo (a near photorealistic renderer), Bongo (design animation), Penguin (a scan-line renderer for creating stylized images of Rhino models) and Grasshopper (a visual programming language). More than 100 other third-party Rhino plug-ins contribute to the program’s popularity.
Clean, Customizable Interface
Rhino 6 for Windows, released in February 2018, retains all the features that have made Rhino a success, while offering numerous improvements. When you first start Rhino, a menu across the top of the screen groups all Rhino commands by function. Below this, a command line lets you type commands and displays prompts and clickable options for the current command. Like AutoCAD, Rhino displays a filtered list of commands that automatically updates as you type, and you can repeat the last command by pressing ENTER when no other command is active.
Below these elements, a toolbar extends across the width of the screen. This toolbar is divided into toolbar groups, each with its own tab, and initially 15 different groups are shown. There is also a second toolbar docked to the left edge of the screen. When you select a different toolbar group at the top of the screen, the toolbar below it changes, and sometimes the side toolbar also updates. To start a command from a toolbar, you click (or sometimes right-click) the tool. For example, only the Undo tool appears on the Standard toolbar. To redo, you simply right-click the same tool.
The main drawing area is initially divided into four viewports that display perspective, top, front and right views of the model. One viewport is active at a time, but you can easily switch between viewports even while in the middle of a command. You can also press the right mouse button to orbit the perspective view and press CTRL and right-click to zoom or SHIFT and right-click to pan in any of these views.
Each viewport has its own drop-down menu that lets you select the display mode for that viewport, as well as the construction plane and other associated features for that viewport. You can quickly maximize any viewport or restore to one of the four standard viewports.
To the right of the viewports are a collection of panels with tools to control viewports, adjust layers and change properties. Below the viewports, an Osnap toolbar lets you select active object snap modes. A status bar across the bottom of the Rhino window shows the current cursor coordinates and drawing units. You can also use tools on the status bar to select the current layer color, toggle drawing aids such as grid snap and ortho, and apply filters. Any of the toolbars, the command window and the panels can be floated, hidden, docked or regrouped. And you can resize viewports, create new floating viewports, split viewports horizontally or vertically and close viewports.
Versatile 3D Modeling
Although the primary entity in Rhino is a surface—an infinitely thin, infinitely flexible, mathematically defined membrane—you can also begin by creating 2D curves, meshes or solids. Any curve can be converted into a surface (by extruding, lofting, revolving or sweeping), surfaces can be joined to form polysurfaces, and solids can be created by joining multiple surfaces to enclose a space. Rhino provides an extremely broad set of tools for creating and manipulating objects.
The Gumball tool—somewhat like the TriBall tool in IronCAD—is particularly powerful. When enabled, this widget displays on a selected object and lets you perform move, scale and rotate transformations around the gumball origin as well as copy objects as they are being manipulated.
Rhino also offers SmartTrack, which are temporary reference lines and points that are drawn in the viewport using implied relationships among 3D points, other geometry and the direction of coordinate axes. You can also turn on history recording prior to performing operations such as surface lofting, so that you can go back later and update objects by editing the input curves.
Because models are based on NURBS, you can display control points on an object and then adjust its shape rather than manipulating the entire object at once. Point editing can be performed on meshes, curves and surfaces, but not on polysurfaces or solids.
Broad Compatibility
In addition to modeling in Rhino, you can import files from numerous sources, including AutoCAD, DXF, IGES, MicroStation, OBJ, SketchUp, SolidWorks, STEP and STL. Rhino also supports 3D digitizers and imports 3D-scanned point cloud data.
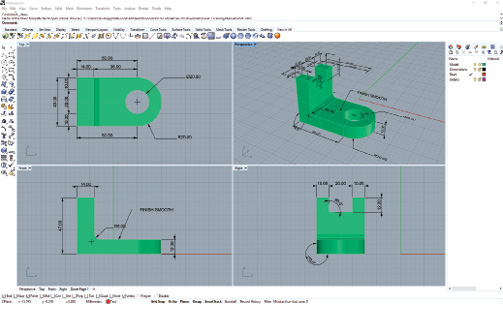
Once you create a model in Rhino, you can add dimensions in any viewport. Dimensions are created parallel to the viewport’s construction plane and appear on those planes in 3D viewports. Annotation styles control the appearance of both annotation text and dimension objects. You can also generate a two-dimensional drawing from a three-dimensional model by projecting the geometry to the world coordinate plane and aligning the views.
In addition to the three orthographic views, a two-dimensional perspective drawing is also generated. Hidden lines are removed and placed on a separate layer. The 2D drawings are created on the Top construction plane near the origin on the world XY-plane and can be viewed in the Top viewport.
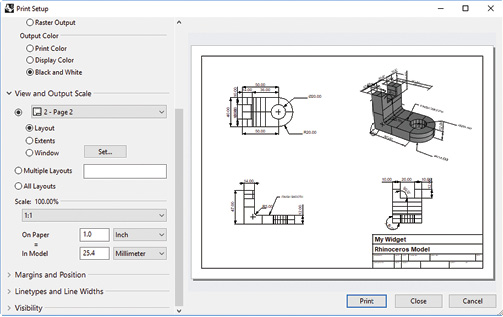
Rhino’s Print command lets you print one viewport at a time. There is also a Layout feature that prints multiple details of the model on one sheet. The details can have different scales, sizes, layer color, layer visibility and object visibility. You can add borders and title blocks and then print the finished sheet.
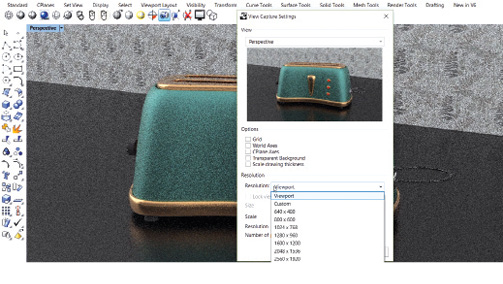
You can also add customizable materials to objects in the model, place lights and render those models, saving the results in several bitmap formats. And you can create sun-study, fly-through, path and turntable animations.
Completed models can be exported as mesh models in many different formats, including ACIS, AutoCAD, Google Earth, IGES, Parasolid, SketchUp, STEP and STL.
New in Rhino 6
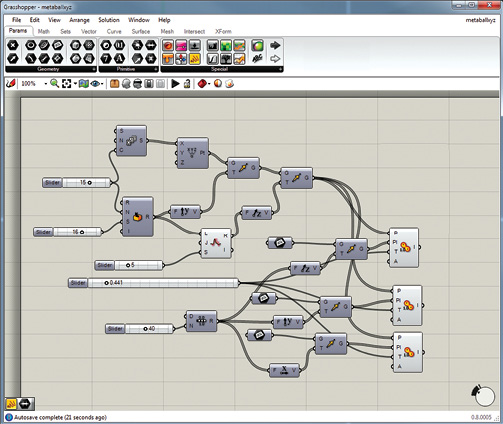
Rhino 6 incorporates the Grasshopper visual programming language, formerly an add-on. Grasshopper is often used to build generative algorithms to create 3D geometry. You can create programs by dragging components onto a canvas and connecting outputs from one component to inputs of other components.
Other changes in the new release include improvements to the Make2D command, a faster display pipeline that includes a real-time ray-traced viewport mode and documentation workflow improvements. For example, you can now use multiple fonts with bold, italic and underline, in a single block of text. Rhino 6 also boasts faster, crisper on-screen display of text in model views and layouts; better control of annotation styles; the support of fields to display data from the document or objects; enhanced tolerance options; support of stacked fractions in all annotations and double-click editing of annotations.
The tools for capturing views now have a dialog to control various settings. A new AddGuide tool lets you create infinite lines that can be used for temporary modeling aids. Meshes can now have facets that are triangles, quads or N-sided polygons. You can distribute selected objects evenly between two points or at a specified distance. You can generate a mesh from a line network. And the Gumball tool can now extrude points.
Capturing Rhino
Though it’s easy to get started with Rhino, the sheer number of tools and the variety of uses means that it can take time to become proficient. There are several resources available to help you learn Rhino, including free downloadable tutorials complete with sample files. There are also numerous online training resources.
Rhino 6 is available as a free 90-day evaluation. After the trial, you lose the ability to save files, and plug-ins stop working unless you purchase a license. There are three ways to license Rhino: Single-Computer activates Rhino on one computer; Zoo lets you float a set of Rhino licenses within your private network; and the new Cloud Zoo option makes your license available anywhere in the world through a login.
Cloud Zoo offers many benefits, including the ability to use Rhino on any computer, create a pool of licenses to share among team members, and automated license provisioning with no client configuration and no servers to maintain. Robert McNeel & Associates also sells add-ons. In addition to purchasing individual licenses for Rhino and these add-ons, the company also sells bundles. Apple users can purchase Rhino 5 for Mac for $695.
It’s no wonder that Rhino has continued to improve and attract new users for more than 20 years. Its power and flexibility mean that the things you can model in Rhino are limited only by your imagination.
Editor's note: [DISCLOSURE: Until its dissolution, David Cohn was the president and sole stockholder of Eclipse Software, Inc. Robert McNeel & Associates was a reseller of Eclipse’s Façade software and Eclipse sold a Façade software bundle that included McNeel’s Accurender software. In 1995, Eclipse sold all rights for Façade to McNeel. David Cohn has had no further business relationship with McNeel since that sale.]
More Robert McNeel & Associates Coverage
Subscribe to our FREE magazine, FREE email newsletters or both!
Latest News
About the Author
David Cohn is a consultant and technical writer based in Bellingham, WA, and has been benchmarking PCs since 1984. He is a Contributing Editor to Digital Engineering, the former senior content manager at 4D Technologies, and the author of more than a dozen books. Email at [email protected] or visit his website at www.dscohn.com.
Follow DE