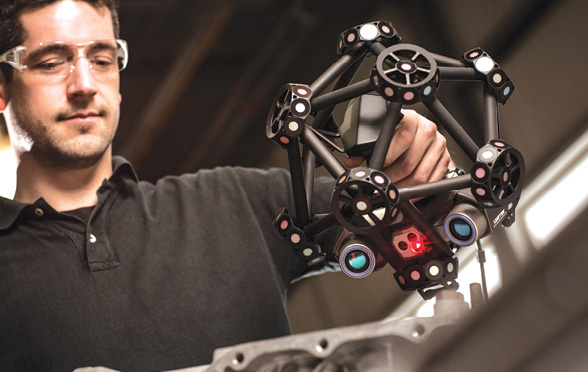
Creaform’s portable optical CMM 3D scanner, the MetraSCAN 3D. Image courtesy of Creaform.
Latest News
April 1, 2018
For large manufacturers, metrology has long played a key role in part and product quality. Now, these same manufacturers in the automotive, aerospace and other sectors are asking their suppliers to provide parts that meet increasingly tight tolerances, which has further expanded demand for metrology solutions.
The global metrology market will experience a compound annual growth rate of 6.82% through 2027, growing from $607.9 million in 2016 to $1.25 billion in 2027, according to a report by Market Research Future. That includes traditional coordinate measuring machines (CMMs) as well as portable CMMs, laser scanners and optical digitizers.
Jim Cassady, factory metrology product marketing manager at FARO:
“As part of their quality initiatives, larger manufacturers will push measurement upstream to their suppliers. Those that need greater quality from their suppliers or subsuppliers are encouraging the use of metrology and measuring equipment, without a doubt.”
Other small- and medium-sized companies are launching their own quality initiatives in order to reduce the amount of back-and-forth that occurs during the first article inspection process. “They have this iterative process that may, in some cases, take 15 iterations and days and weeks,” Cassady says. “They are now doing their own inspections and not waiting for the customer to tell them it’s not right.”
For their customers, this measuring capability also eliminates the need for multiple trips to the CMM machine that can create bottlenecks.
Les Baker, senior applications engineer and global ScanArm specialist at FARO:
“These mom-and-pop shops are trying to find ways to distinguish themselves as customers try to drive down the piece price they are wiling to pay. These smaller establishments need to find a way of increasing the value they supply, and a great way to do that is to ensure product quality before it leaves their facility.”
Rick White, director of business development, at Capture 3D:
“By having a precise color map inspection report comparing the actual to the nominal, companies are able to quickly see the areas of deviation of the entire object to have a better understanding of what is occurring. This dramatically reduces the number of iterations [and] rework and helps avoid unforeseen costs for a leaner and faster time to market.”
Cost, Staffing Challenges
However, small- and medium-sized businesses (SMBs) may be reluctant to invest in metrology solutions. One of the biggest obstacles for smaller companies trying to implement metrology is the cost of the equipment. Large CMMs are expensive and complicated to operate. The company may also have to hire new staff to operate the measuring equipment or manage the quality program.
 Portable metrology offers an affordable alternative to CMMs for many use cases. Image courtesy of Creaform.
However, there are now smaller and more portable laser scanners and other equipment that can provide measurement accuracy at a lower cost and with less training.
Many engineers don’t understand how laser scanning or other forms of metrology can help them, according to Frank Thomas, metrology and additive manufacturing solution specialist at Adaptive Corp. “It would surprise you how many engineers—when we show them the ability to 3D scan a part in a minute or two and in three mouse clicks, tell them if it matches their tolerance requirements or not—have never seen that,” Thomas says. “It was not nearly as fast and simple in the past as it is today.”
Advancements in metrology solutions are making it easier to use and less costly to deploy. For instance, Hexagon Manufacturing Intelligence launched a new version of its PC-DMIS 2018 R1 software that makes it easier to convert AutoFeatures to points, and can reduce measuring time while making it easier to analyze data.
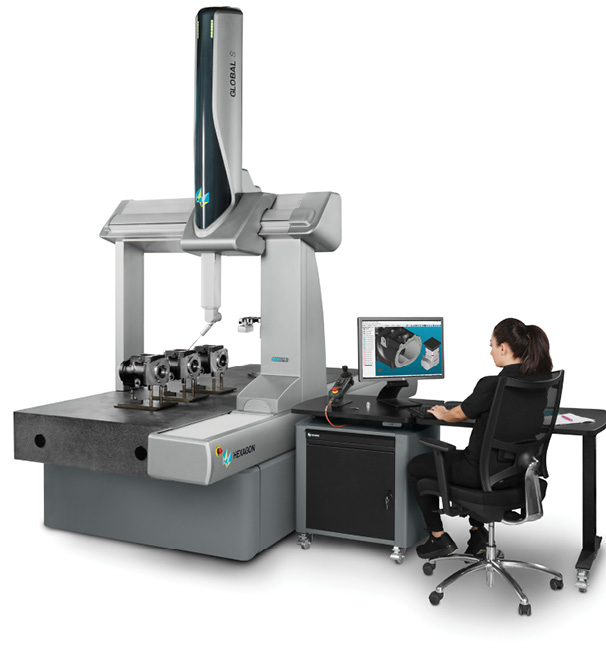
Manufacturers are also making CMMs and other measuring equipment more adaptable. Hexagon, for example, has also released a new version of its GLOBAL S CMM series that can be configured with different software and probe options to meet a customer’s specific application needs.
Jonathan O’Hare, user experience strategist at Hexagon:
“We’re taking away some of the technical implementation issues associated with using the machine. This can make it a more useful tool by eliminating some of the technical steps in the workflows that are now unnecessary because of the technology available.”
Smaller companies with tighter budgets may look into buying a used CMM system, but other options are emerging. There are also challenges to using a traditional CMM that may make them unappealing to these manufacturers.
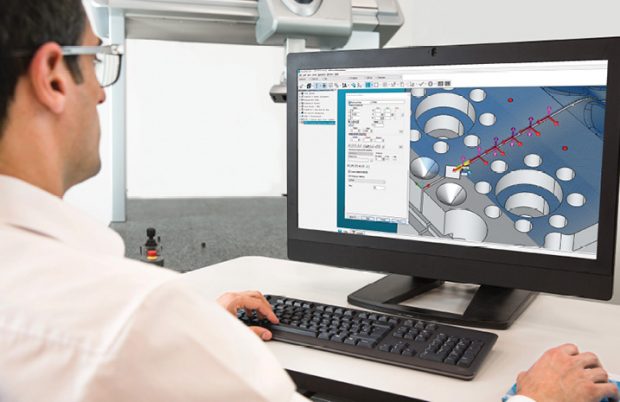
 INSPECT software, first introduced with PC-DMIS 2017 R1, can help visualize measurements in CAD. Image courtesy of Hexagon Manufacturing Intelligence.
“In a lot of organizations, CMM becomes the slowest link in the process,” Thomas says. “You have to custom fixture the CMM, and there is a lot of turnover among programmers.”
Thomas says Adaptive often encourages customers to adopt portable metrology, which may not be quite as accurate as a CMM but is much easier to use.
Portable metrology equipment is more flexible, costs less and makes it easier for smaller companies to get started without as much programming or training. “You can inspect products on the plant floor or on the CNC machine,” Thomas says.
3D scanning equipment can be used to inspect parts with complex contours and surfaces, whereas portable arm-style metrology devices can be used for simpler designs. There are also optical digitizers that use cameras and sensors.
For customers that may require highly accurate measurements (say, within 7/10ths or 9/10ths) for some aspects of a product, a hybrid approach might be more useful. “In many cases, they may only have two or three measurements that require very high tolerances,” Thomas says. “Why are we using the CMM on everything? Let’s use a portable device to get the first-pass review of the part, and if it passes then you take it to the second stage for CMM. If I scan something and it does not pass, I can find that out faster and rework the part sooner than having to stand in line for the CMM.”
Capture 3D provides both laser scanner and optical digitizer solutions using ATOS equipment from GOM. “The ATOS Core Essential Line was created to address the needs of companies that may not have the budget to invest in a larger system, but don’t want to compromise on quality,” says White. “ATOS software is intelligent and intuitive, so it does not require any specialized programming skills like a CMM. We have training classes year-round at our facilities, which help make learning the systems easy for those who are concerned about staffing challenges.”
At Hexagon, O’Hare says the company has altered its PC-DMIS software to meet the needs of different classes of manufacturers. For smaller job shops, the INSPECT application in PC-DMIS can help visualize in CAD what the shop is measuring as they are measuring it, and that can help facilitate manual alignments.
Another utility in the software helps larger batch manufacturers create a playlist-style setting to select different routines that run in series as a single program, without the need to reset the program.
“Software is everything,” O’Hare says.
Metrology Improves Efficiency, Lowers Costs
Even with these advancements, smaller companies still need to cost-justify an investment in metrology solutions. In most cases, this can be quickly accomplished through reducing the cost of creating and measuring multiple test pieces and improving efficiency.
Des Moines, IA-based Auto-jet, which provides mandrel tube bending and stainless steel tubing for automotive exhaust and other applications, has deployed FARO’s Edge ScanArm HD portable CMM and Advanced Tubular’s V-Tube LASER software to replace manual measurements.
The laser scanning system and software have saved operators 10 to 15 hours per week in programming time. They can also quickly reverse engineer customer-supplied pipes, reducing the time needed for measurement and engineering by half.
 The GLOBAL S coordinate measuring machine (CMM) is available in three performance levels: Green, Blue (shown here) and Chrome. Image courtesy of Hexagon Manufacturing Intelligence.
These systems also reduce scraps and improve part quality by ensuring that parts are in-spec before they are shipped to a customer.
This saves time by reducing the number of iterations needed to get to the final product. Another FARO customer, sheet- and stamped sheet metal fabrication shop, Laser Specialists, is using the FAROBlu Laser Line Probe to eliminate delays associated with part inspections. In the past, customers would send math data and stamping to the company. After cutting the stamping, Laser Specialists would send the part back to the customer for inspection, then make any edits and cut new samples for additional inspection. The process could take several weeks and multiple inspection phases.
In addition to eliminating those multiple iterations, the company is able to identify any anomalies between the customer-provided parts and associated CAD files. The solution also reduces equipment downtime. “They need all of their shifts running constantly, so you not only shorten time to revenue, but you also make the whole process easier so you don’t have any extra downtime,” Cassady says.
With greater accuracy, smaller manufacturers are able to meet the requirements of more advanced customers, which can potentially win them new business.
Metrology is also playing an increasing role as more companies turn to 3D printing and additive manufacturing to create both prototypes and finished parts. Metrology equipment can be used to both reverse engineer existing parts that can be printed, as well as inspecting printed parts—which can show high degrees of variance, depending on the print process and material.
“The shapes are more complex, and you can’t measure these items with the same point surface sampling strategies we would with traditional manufacturing,” O’Hare says. “It lends itself to more optical and non-contact scanning to measure surfaces and get into tight cavities where internal shapes can’t be visualized or accessed by probes.”
This also allows companies to measure the entire surface. “In traditional machining, if you measure a drilled hole at one level, you can assume the same thing is happening further down the hole,” O’Hare says. “With AM, depending on the build layer, the shape could vary. It’s a greater benefit to measure the entire surface.”
Thomas adds that laser scanning and inspection can be used for model-based definition processes in 3D printing. “If you are doing traditional manufacturing and there is no 2D drawing, how do you inspect and validate and qualify the part?” Thomas asks. “The metrology solutions we provide have the ability to read the model-based definition incorporated in a 3D model without creating drawings.”
The types of portable metrology devices that are most appealing to smaller companies can also enable additional applications that can help accelerate the return on investment. “We have customers who justify the purchase on one or two applications, but once they have the technology and understand what it brings them, they are able to implement it throughout their processes and get additional cost savings they didn’t envision,” says FARO’s Baker.
More FARO Technologies Coverage
For More Info
Subscribe to our FREE magazine, FREE email newsletters or both!
Latest News
About the Author
Brian Albright is the editorial director of Digital Engineering. Contact him at [email protected].
Follow DE


