Introducing Mazak iConnect Add-in for Fusion 360
Add-in allows Autodesk users to export the NC program, part/fixture/stock geometry and tool/holder geometry in a special format from Fusion 360.

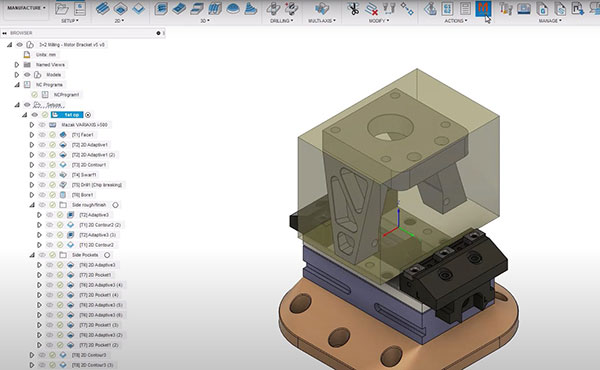
Walk through the new Mazak iConnect Add-in, now available from the Fusion 360 app store. Image courtesy of Autodesk.
Latest News
October 18, 2022
The new Mazak iConnect add-in allows Autodesk users to export the NC program, part/fixture/stock geometry and tool/holder geometry in a special format from Fusion 360, which can then be imported into Mazak’s Smooth Project Manager software.
By verifying what we see in the digital workspace on the real machine without actually having to cut a part, we can:
- Check for collisions.
- Minimize the risk of damage to the machine or part.
- Identify any moves that exceed the machine limits.
- Check for tooling errors.
This reduces the need for a skilled operator to spend time proving the machining programs before they can be used for production.
How to Access Mazak iConnect
Start by downloading the Mazak iConnect Add-in from the Fusion 360 App store here. Access the App Store from within Fusion 360 by going to the Utilities tab and choosing the Fusion 360 App store. Type Mazak iConnect in the search bar. Download and follow the on-screen instructions to install the app.
To verify the app has been installed, open the Scripts and Add-Ins page from the Add-ins drop-down. Click on the Add-Ins section, and see the Mazak iConnect app available. Select the app and check the Run-on start-up checkbox if you always want the add-in to be active when launching Fusion 360. Now click the Run button.
That the add-in is only visible when you’re in the Manufacturing environment. A pro tip for easier access in the future is to pin the icon to the toolbar.
How to Use Mazak iConnect
Start by opening the model you want to export to the Smooth Project Manager Control. Next, identify the model geometry and fixture geometries accordingly — this definition is critical to making the export process accurate, according to Autodesk.
Now navigate to the Actions tab and select the Mazak iConnect add-in. Make sure you’re in the Smooth Project Manager or SPM tab of the add-in. Next, define an output folder location for the Fusion 360 data. A pro tip is to define a location on a cloud-based platform like Microsoft One Drive to ensure the data automatically backs up.
The Machine type is defined by the Operation type you have within your setup. For milling, Variaxis and Machining center are available while for turning Integrex Horizontal, vertical and Turning are available.
Next, select the relevant postprocessor for the machine controller. If you don’t have one, you can download a suitable Mazak post here. After specifying a suitable post processor, specify a suitable program number. At this point, you can specify which information gets exported from Fusion 360. This can involve the tooling, the model data, the fixture, or the stock model data.
Clicking the export button creates the NC program in the text editor of your choice and bundles the checked model elements into the output folder. In Fusion 360, a progress bar will show the status of the export and an Export Complete dialog will pop up when the export is complete.
For more product details, click here.
Sources: Press materials received from the company and additional information gleaned from the company’s website.
More Autodesk Coverage
Subscribe to our FREE magazine, FREE email newsletters or both!
Latest News
About the Author
DE’s editors contribute news and new product announcements to Digital Engineering.
Press releases may be sent to them via [email protected].


