3D Scanning: Do Your Point Clouds Have a Purpose?

Artec Studio software from scanner maker Artec 3D includes robust tools for editing and aligning scan data. Image courtesy of Artec.
July 1, 2018
If CAD models are the ideal representation of how parts and components are supposed to be built, then 3D scan data is the reality, and shows how the products arrive at the customer’s site, as well as how they’re installed, deployed and used in the field.
From metrology-grade 3D scanners that cost upwards of $10,000 to iPad-attachable devices that cost around $400, various hardware allow users to scan and digitize physical objects. And the quality of the data you get also varies, in resolution, tessellation and accuracy. But depending on the purpose and the application, low-resolution data from a low-cost device could be just as useful as the hardware beyond your budget.
Using an inappropriate level of detail could unnecessarily introduce guesswork or overburden the modeling software. The key is having a clear understanding of the purpose of the scan.
Why We Scan
An archaeologist might capture a newly discovered ancient wall fragment in 3D for subsequent digital analysis and reconstruction. A facility manager might scan the interior of a property to see if it has sufficient clearance for a new machine. A prosthetic designer might scan an amputee’s joint to create a custom-fitted socket. An automotive engineer may scan an automotive chassis component to study its wear and tear over time. These all have different purposes, with different data requirements.
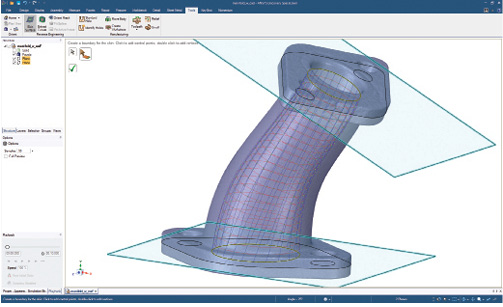
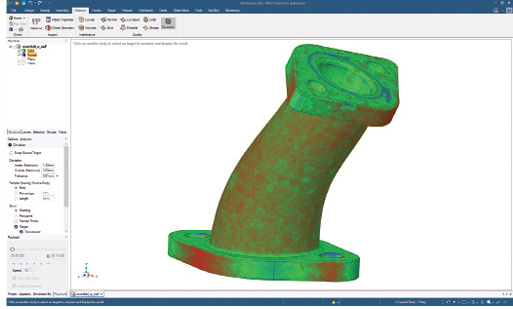
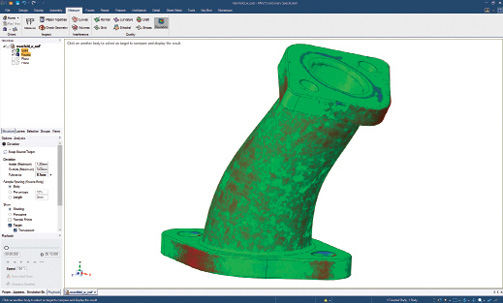
In ANSYS SpaceClaim, you can work with imported scan data to reverse-engineer a part or compare the scan data to the original engineering drawing for deviation analysis. Images courtesy of ANSYS.
Because of the precise measurements needed to figure out equipment installation path and placement, the facility manager may be less forgiving than the archaeologist, who works at a much larger scale and is more concerned with the general shape of the artifact. The prosthetic designer who plans to use shock-absorbing materials between the socket and the patient’s limb doesn’t need submillimeter accuracy. On the other hand, the automotive engineer who plans to study the minute deviations of the part’s fatigue patterns to understand wear and tear may insist on a metrology-grade scanner. Collecting scan data at the wrong level of detail, resolution or accuracy can add unnecessary data processing and cleanup tasks.
“Sometimes people scan objects to build new geometry to fit around it. In that case, they’re not exactly reusing the scan data to rebuild the object’s geometry. They’re only using the scan as reference points [for the new geometry],” says Roman Walsh, product manager, ANSYS. “But in other cases, people might scan an object to quite literally rebuild what they’re scanning.”
Old machine parts that are cracked, chipped or worn out and no longer in production, for example, may need to be remade using metal-based 3D printing. In such a case, the scan has to be meticulous, with enough geometry definitions to manufacture a near identical part.
“Look for the smallest feature you’re trying to capture,” advises Daniel Lainchbury, engineering manager, Physical Digital. “As a rule of thumb, to capture a 1-mm radius, you’d need to scan the object at 100-microns resolution at a minimum.”
The Role of the Software
Physical Digital, based in Guildford, Surrey, U.K., employs scanning systems from GOM to offer scanning services and consultancy to the automotive, aerospace and locomotive industries. “We use GOM system’s hardware because there’s traceability from the start of the project to the end,” says Tim Rapley, CEO of Physical Digital. The software that comes with the device allows him and the firm’s engineers to perform data processing and inspection reports without additional software, he adds.
Most scanning device makers offer software for processing scan data. The quality of this software affects how easily you can align the scan data from different scanning sessions into a single model, or how easily you can convert the data into CAD-editable mesh models or 3D-printable stereolithography (STL) models.
A New Generation
Earlier scanners’ output was usually point clouds—clusters of points indicating the positions of the surface geometry of the target object. But over time, scanners get more sophisticated; so too do the firmware and the scan data processing software.
“Our scan data processing software Artec Studio is directly compatible with Geomagic Design X [from 3D Systems], and also with SOLIDWORKS [from Dassault Systèmes] if you have the Geomagic for SOLIDWORKS plugin,” explains Andrei Vakulenko, chief business development officer, Artec 3D. “You just click on the Export to Design X button or the Export to SOLIDWORKS button in Artec Studio and your model seamlessly opens in Design X or SOLIDWORKS.”
Artec 3D is known for a line of handheld 3D scanners. The latest in the series, Leo, is cordless and features an inbuilt screen, making it much more versatile and mobile than other scanners that require a wire connection to a laptop or desktop. Leo takes advantage of the onboard graphics processing unit (GPU) to perform most data processing on the edge, thus eliminating the need to borrow processing power from a laptop or desktop.
The Cloud Appeal
Artec 3D is also looking at the cloud as another way to perform remote data processing. “For many people, it would be much faster to work with 3D data if they could process data in their cloud, rather than on their own computer,” notes Vakulenko.
Another software maker who shifts to the cloud depending on data intensity is Autodesk. “The key is to ensure data interoperability between different systems, and we believe cloud technology is the fastest and most scalable platform to do this. For example, you can generate a 3D textured-surface mesh from the points. Currently, this is a cloud service available in Autodesk ReCap; it works for any structure point cloud format registered in ReCap,” explains Tristan Randall, strategic projects executive, Autodesk.
Autodesk ReCap, the company’s reality capture software, allows users to create 3D models using photographs and laser scans, and then use the data in any of Autodesk’s software like Inventor, Fusion360 or Revit, as well as third-party tools. The software is compatible with mobile devices, such as the iPad Pro. It includes a set of tools for point editing, measurement and data cleanup.
Other Autodesk software such as Autodesk Revit (for architecture, engineering and construction) and AutoCAD also include tools to ingest scan data and, if needed, convert it into mesh models. “The user imports a point cloud, then uses various plan, elevation and section views to snap lines to the point cloud data that can be used to generate parametric model objects, such as walls or windows,” explains Randall. “Another approach is commonly referred to as feature extraction, where an algorithm directly extracts geometric primitives from the point cloud data.”
CAD and Scan Can Coexist
One third-party software Physical Digital uses is ANSYS SpaceClaim, a direct modeling package that lets engineers easily edit and modify imported 3D models with or without parametric history. “SpaceClaim supports our operations from designing fixtures to reverse engineering,” says Lainchbury. “We find that we can use it for quick design mockups for internal discussions, but also for producing manufacturing drawings with tolerances.”
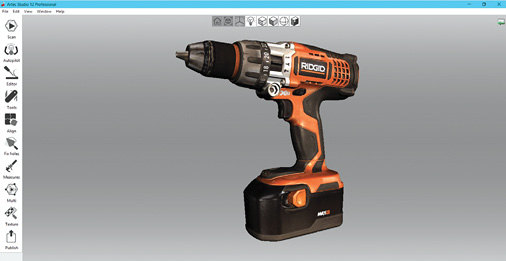
Artec Studio software from scanner maker Artec 3D includes robust tools for editing and aligning scan data. Image courtesy of Artec.
“SpaceClaim can work with faceted data like STL files. We chose that route because most of today’s scanner software are capable of exporting that format,” says Walsh. This is an improvement from previous generation scanners and their firmware, which provided the scan output in point clouds with little or no help to easily convert them into mesh models.
“Today, saving point cloud files [from the scanner] as mesh data is a feature readily available in most scanners. It’s rare that we’d get point-cloud files, especially in manufacturing, but if we did, NX could handle that,” says Tod Parrella, product manager, NX, Siemens PLM Software.
Siemens PLM Software, makers of the NX CAD-CAM software, benefits from Convergent Modeling technology, a component of the company’s Parasolid geometry kernel. The kernel is available for licensing, so many of its tools are also found in other CAD programs, including some from Siemens’ CAD rivals.
“Why should you have to reverse-engineer the scan model [into a CAD-editable 3D model] first? Why can’t you just use the scan model directly in CAD? Prior to Convergent Modeling, you’d have to reconstruct the mesh model into CAD. But with Convergent Modeling, you can work with that, in NX, just like any other solid part,” explains Parrella.
Don’t Mess With My Mesh
Sometimes, due to the impossible reaches of certain corners or manual operations, the resulting scan data and mesh model may be incomplete or imperfect. “If people use handheld scanners or light scanners, it’s very difficult to scan all angles of a part in 360° and get all the details in complex models. It’s almost impossible to get the internal features,” says Parrella.
Many scanner firmware and scan-data processing software offer tools to automatically patch these inevitable holes and fill in the gaps. “Smoothing and hole-filling are probably the two most common operations CAD users do to clean up scan data. NX has a robust set of scan cleanup tools,” notes Parrella.
But both Physical Digital’s Rapley and Siemens’ Parrella feel users should use these tools judiciously. “If the object you’re scanning is full of holes and gaps to begin with, and you need an easy way to digitally fill them in your model, these tools are helpful,” says Rapley. “But if you plan to reverse-engineer something accurately, you shouldn’t use these tools to make up for the poor quality scan data, resulting perhaps from operator inexperience.”
“If you’re using the scan data for reverse engineering, you typically want to leave the data as is; keep it in the most natural form. You don’t necessarily want to reinterpret a missing feature if you don’t know the original part,” says Parrella.
The more users implement such automating tools, the more guesswork is involved in reconstructing the model. Thus, it could introduce deviations from the actual object. Ultimately, the less users have to mess with the meshes, the better.
Working With Scan Data Natively
Inside ANSYS SpaceClaim, there are tools to automatically smooth the rough edges in scan data or heal flawed geometry, but, Walsh says, “you don’t necessarily have to clean up the scan data. Even with scan data that has missing features, you can still execute parametric operations to create new geometry around it.”
In ANSYS’ designer-friendly simulation programs such as ANSYS Discovery Live, users can import the scan data and use it as is, according to Walsh. This might be important for those who want to conduct structural analysis or fluid flow simulation on models that represent the products as they are deployed in the field—for example, beams and pipes at a construction site.
Photogrammetry and Others
There are other ways to inexpensively digitize an object using depth-sense cameras and photogrammetry. Their use is prevalent in architecture, according to Randall. “But 3D laser scanning, also commonly referred to as LiDAR, for Light Detection and Ranging, is considered the most accurate method for reality capture.”
“There is no affordable depth-sensing camera that can provide the accuracy of a professional 3D scanner,” Artec 3D’s Vakulenko notes. “Secondly, they can’t guarantee repeatability of results. Finally, the manufacturer of a consumer product doesn’t guarantee the provision and support of the product over a long-term period.”
Scan data resulting from photogrammetry, which involves photo-based reconstruction of 3D objects using approximation algorithms, may not be good enough for reverse-engineering end-use parts and components. However, they can satisfy certain users, whose sole purpose is to obtain the general shape of an object—a statue in a park, a building or a room’s layout, for example—for reference, inspiration or preliminary spatial studies.
For More Info
Subscribe to our FREE magazine, FREE email newsletters or both!
About the Author
Kenneth Wong is Digital Engineering’s resident blogger and senior editor. Email him at [email protected] or share your thoughts on this article at digitaleng.news/facebook.
Follow DE


