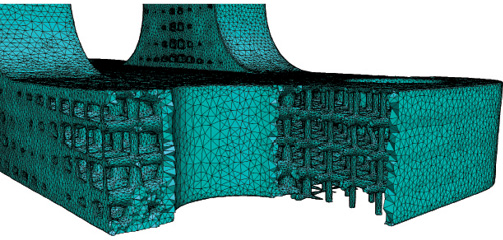
A printed object can be CT scanned, and the images can be passed through Simpleware software and into ANSYS’ software so designers can compare the physical object to the original CAD file. Images courtesy of ANSYS.
Latest News
January 2, 2018
In the medical field, computed tomography (CT) scanning has helped enable new 3D printing applications—physicians can use 3D-printed models of human organs (like the heart) generated from highly accurate CT scans of patients to prepare for complex surgeries, for example.
However, CT scanners could play an even more important role in additive manufacturing in the future by providing detailed quality scans of printed parts for many industries. They are already being used to scan items for reverse engineering operations that use 3D printing.
“3D printing allows you to produce previously impossible products, but you cannot inspect them without 3D scanning,” says Gerd Schwaderer, business development, metrology, at Volume Graphics. “If you can’t inspect your product, you can’t sell it.”
“When it comes to 3D printing, it’s like somebody invented a problem that we already had the solution for.”
— Gerd Schwaderer, Volume Graphics
The CT scanner market is poised to reach $6.5 billion by 2022, according to a Transparency Market Research report. Unlike other types of 3D scanning and metrology, CT scanners can provide precise dimensions of internal and external structures. The only other way to take those measurements is through destructive testing; you’d have to break the part or assembly to see inside.
Because 3D printing allows companies to produce parts with highly complex internal structures (channels or lattice patterns, for example), CT scanners can potentially help verify the accuracy of printed parts that are to be used in production environments. “We see a lot of interest in printing components because of the complexity it allows, particularly in aerospace and other industries,” says Steve Pilz, additive manufacturing product manager at ANSYS. “But there’s also this innate fear of putting one of these things on a plane or into production because they can’t see what’s inside.”
As more additively manufactured parts are evaluated for use in critical applications (like aerospace or automotive) where accuracy and structural integrity are important, CT can take those measurements without destroying costly parts.
“CT scanning is really the natural companion of 3D printing,” Schwaderer says. “When it comes to 3D printing, it’s like somebody invented a problem that we already had the solution for.”
For polymers, CT scanning can detect potential part failures. “I can look at material flow and detect flaws in the manufacturing process that can’t otherwise be predicted,” says Rus Emerick, director of application engineering at Laser Design. “You can verify mold flow using CT and do a lot of fine-tuning.”
But so far there aren’t that many companies combining CT scans and 3D printing. In part, that’s because many customers don’t understand the technology or how it can benefit 3D print operations.
“They often have no clue how it works,” Schwaderer says. “They think it’s magic because they’ve only seen it in the context of a doctor’s office.”
CT scanning works by taking hundreds of X-ray images of a part as it is rotated inside the scanner. The 2D images are then combined to create a 3D point cloud. In quality applications, the CT image can then be compared to the CAD file to measure accuracy of the print.
“People don’t seem to understand they are two sides of the same coin,” says Giles Gaskell, applications manager at Wenzel America. “If you can make it on a 3D printer, you can measure it with a 3D scanner. If you are going to use 3D printing to make a part and it has a lot of internal detail, then you can’t measure it any other way.”
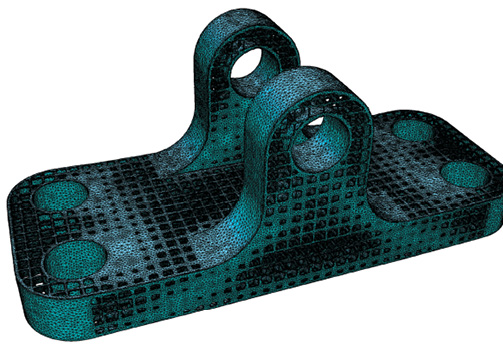
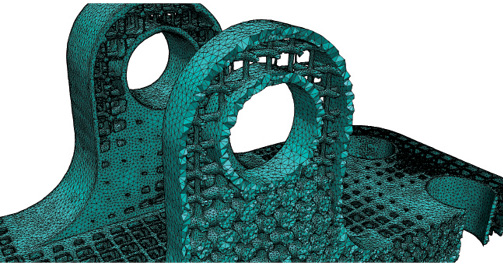
 A printed object can be CT scanned, and the images can be passed through Simpleware software and into ANSYS’ software so designers can compare the physical object to the original CAD file.
Images courtesy of Synopsys.
Gaskell also theorizes that the reason many companies aren’t using CT scanning for quality inspection is that they aren’t really taking full advantage of 3D print capabilities. “If they were making full use of the technology, they’d be making parts that they couldn’t measure conventionally,” Gaskell says.
CT scanning has also improved significantly in resolution and speed over the past several years, while dropping in price. Many scanners can provide resolutions down to 5 to 7 microns (or less). The software running the scanner has also gotten easier to use, although interpreting scan results is still complex.
“CT is more of an interpretive science,” Emerick says. “To determine the edge of an object, if you are using laser scanners, then the edge is either there or it’s not. With CT analysis software you have to establish where the edge of the part really is, which is somewhere between air and 100% material. It takes some skill to interpret that data at the sub-voxel level.”
Cost is also an issue. Although prices have fallen, quality CT scanners still cost hundreds of thousands of dollars. For many companies, outsourcing to a service provider is more cost effective.
Uncovering Inconsistency in 3D Printing
According to several sources contacted for this story, some 3D printer manufacturers and service providers have also pushed back against CT scanning because there are still significant quality issues with many 3D print processes. The accuracy of a print for the same part on two different machines, or on the same machine at different times or run by different operators, can vary significantly. Many printers still don’t provide the type of reliability and consistency required for mission-critical parts and components because of issues with porosity or delamination.
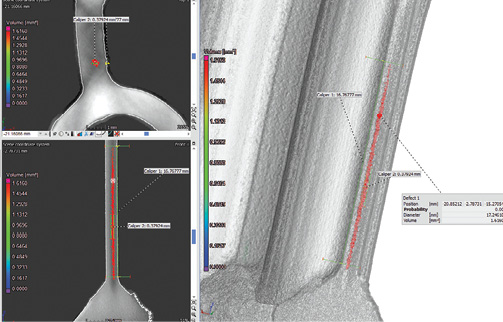 Porosity Zone indicates porosity within a 3D printed metal part along with varying density in the various layers along with visible voids. Image courtesy of Synopsys.
“There’s not only less interest among 3D printing people in CT; there’s a thinly disguised hostility in some cases,” Gaskell says. He describes an experience in which his company was given printed parts by a customer to evaluate against a CAD file. “We had a conference with the customer and printing people, and I thought the parts were being measured against the wrong CAD file,” Gaskell says. “The internal features had been so butchered by the printing process that they didn’t match the CAD anymore.”
Emerick agrees that CT scanning is critical for some 3D printing applications.
“The ugly truth is that additive manufacturing inherently causes flaws,” Emerick says. “With aerospace, if you get the slightest amount of porosity in the wrong place, you will break that part when you put [it] under a load. The more advanced companies realize they have to be able to analyze the quality and integrity of printed parts, but it’s still in the early stages. If it’s a mission-critical part, you should have a CT system to verify the structural integrity of the parts you are producing.”
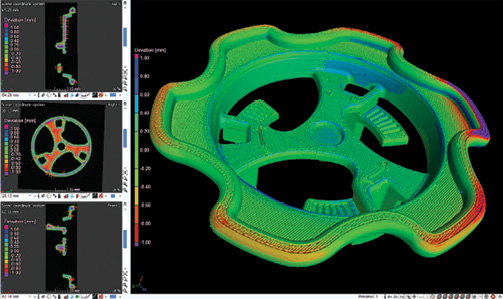 Deviations are a comparative analysis between CAD and the 3D printed specimen. Image courtesy of Synopsys.
He expects that as quality standards emerge and end users get a better grasp of 3D printing, there will be greater use of this type of CT scanning.
CT Scanning Limitations
3D printing doesn’t pose any special challenges when it comes to CT scans, but the inherent limitations of the scanning technology still apply.
Multi-material items are challenging, for example. This is particularly true if both metals and polymers are present. “You have to jack the power up to get through the metal, which overexposes the polymer,” Emerick says. “You may have to do multiple scans of the same assembly at different power settings to get a good final image.”
Dense materials might be difficult or impossible to scan. This is an important limitation in some aerospace and automotive applications where different types of metals are present. Titanium, for example, can be scanned but materials like cobalt chrome (which is used in high-heat applications) cannot.
“The holy grail is to be able to 3D print turbine engine components with a lot of internal features rather than cast them,” Gaskell says. “CT struggles with that because the material is very dense, and that problem applies whether those are cast or printed parts. There’s not a machine powerful enough to scan the blades that is also accurate enough for the metrology on the inside of the part.”
“The closer you get to lead on the periodic table, the harder it will be,” Emerick adds. “Platinums, gold and silver cause a lot of problems. Inconel is [a] very noisy metal. Bronze is atrocious. Most people don’t understand metallurgy and the effect of irradiating metals, and how that impacts the quality of the scan.”
In addition, the size, geometry or thickness of the part can create scanning challenges. Printing materials may also display different behaviors than similar material used for casting. “We’ve run into that with additively manufactured parts,” says Nick Brinkhoff, product manager at North Star Imaging. “They tend to scatter differently than conventional parts.”
Quality Will Drive CT Adoption
The adoption of 3D printing is still in its nascent stages when it comes to end products and production parts. End users and printer manufacturers are still working to create consistency in additive manufacturing processes, develop quality standards and improve the handling and storage of sensitive materials.
And many companies aren’t yet designing for 3D printing—they are simply printing parts that could be cast or molded. Once the designs increase in complexity, the need for better measuring and inspection approaches will increase.
Gaskell expects that customers will eventually push for greater use of CT scanning for quality control and validation as they take advantage of 3D printing capabilities. CT scanners currently offer greater resolution than 3D printers, which means they are tailor made for identifying defects.
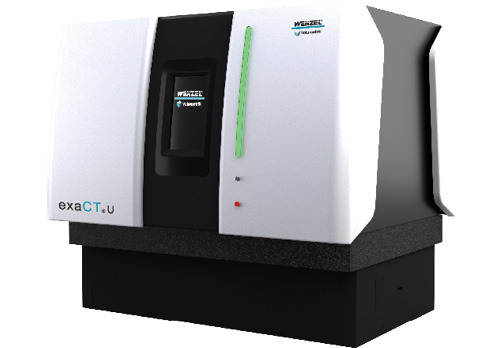 The Wenzel exaCT U desktop CT solution can be customized for different applications. Image courtesy of Synopsys.
“CT is way ahead in terms of resolution,” Gaskell says. “When it comes to materials, the 3D printing people are ahead of us. They can print parts we can’t measure because of the material, but they can’t make parts that are more accurate than we can measure.”
Schwaderer thinks there could eventually be combined print and CT scan systems that do in-line inspection of builds as they are being made. “You could evaluate a print line by line because the printers operate so slowly,” Schwaderer says. “That would allow you to adjust the machine during the build, or stop a bad print early and start over.”
The key will be tying CT scans into CAD and simulation processes. CT scan data has to be converted into different file types to be useful to engineers. In some cases, the converted files may be too large to open in certain software programs.
Volume Graphics has released a new Structural Mechanics Simulation Module for its VGSTUDIO MAX 3.0 that can take a CT file and (without meshing) calculate its porosity and do a simulation to determine if it is “good enough” for its application, even if there are imperfections.
By feeding CT scan information back into simulation tools, users can also create digital twins and simulate the performance of a physical part rather than a CAD file. ANSYS, North Star Imaging, and middleware provider Synopsys have done just that, in fact.
In 2016, Synopsys acquired Simpleware, which offers a solution that uses image-based meshing to convert CT scan images into files that can be used in finite element analysis tools. North Star can scan a printed object, then pass the images through Simpleware and into ANSYS’ systems so that designers can compare the physical object to the original CAD file, as well as run simulations based on the actual printed product.
“The key to this is high-value parts,” says Kerim Genc, Simpleware solution account manager at Synopsys. “You aren’t going to do this type of analysis on a cheap plastic part. Down the line, when you want to do scheduled maintenance on a high-value part and see how it is performing, you can also use CT scanning and FE models to do analysis. This isn’t just for the production line.”
Once the data is available, though, it can drive improvements across an organization. “We have customers who are trying to replace CMMs, and CT scanning gives them all the data they need for validation,” says Brinkhoff at North Star Imaging. “With one CT scan, you can do analysis for voids, do the dimensional inspection and run simulations.”
According to Emerick, CT is only going to increase in value for 3D printing and other types of manufacturing, because it provides a central set of data that can be used across multiple operations. “All the data is there,” Emerick says. “From metrology to porosity to stress. You can do a complete structural stress analysis on the information provided, and everyone from engineering to manufacturing to marketing can extract the information they need. That’s a big deal.”
More Info
Subscribe to our FREE magazine, FREE email newsletters or both!
Latest News
About the Author
Brian Albright is the editorial director of Digital Engineering. Contact him at [email protected].
Follow DE


