CAD to CAM: Where it Started and Where It’s Going
A brief history of the design drawing and how integrated translators and a new standardwill carry it into the future.
Latest News
January 1, 2005
By John Wedrychowski
In the beginning was the drawing; and either alone or with companiondrawings, it served as both the definition of a product and theinstruction sheet for making it.
Perhaps in the very beginning, before Descartes,before even the adventof law that governed ownership, drawings existed solely for the purposeof providing manufacturing instructions. They were produced— not alwaysaccurately—to show how something should be made.
However, ancient architects aside, after mathematicians such asDescartes promoted the understanding of analytical geometry, accurateengineering drawings could be produced and drawing standards began toemerge. The drawing became the kernel of product definition and oftenthe legal entity. That is to say it became the point at which ownershipof an idea could be legally established and legal liability assigned.The engineering drawing has been an essential part of the developingworld since at least the industrial revolution.
Things have changed. We have come a long way from sole dependency onthe drawing, or on 2D representations. We now use widespread 3Dcomputer-aided design (CAD).

Even so, in many places the creation of a drawing is still a goal, amilestone. It reflects achievement and a point of completion. Though nolonger generally produced with pencil and paper, it is still a work ofart, and something to be read by skilled engineers who will gather overit and pronounce wise interpretation. Yet it is still with us. Now,more than 25 years into CAD, why is the drawing still so important?
The drawing has lasted despite the progress of technology because itdoes something that CAD technology only effectively included recently.It presents information that is not routinely part of the CAD model.
Genuine Benefits
In the early days of CAD, people spoke of drawing productivity and CADentered the world of design engineering like the word processorappeared in typing pools. It was going to save man-hours and increasethe throughput of the drawing office. Early CAD systems often did speedthe production of drawings, especially where modifications to anexisting electronic design were required. However, the goal then wasstill the production of a paper copy—a drawing.
The introduction of CAD to the mix didn’t go smoothly. Skilleddraftsmen could often match the speed of electronic drawing productionand were frequently able to do things that couldn’t be done on the CADsystem. For example, in early CAD systems, the addition of extra detailsuch as surface finish and other machining detail was not as automaticas, say, adding dimensions. The draftsman could still do it morequickly. A battle ensued in which CAD system vendors searched forunique benefits and productivity gains to compel engineers in alldisciplines to accept this new and exciting technology.
Generic productivity gains included such things as modification ofdrawings, where geometry could be stretched on a screen, dimensionsupdated, and a new drawing plotted in minutes. The speedy manualalternative was to modify only the dimensions without changing thedrawings—a practice completely contrary to producing accurate drawingsin the first place. Here CAD won hands down, becoming as much as fiveor ten times faster than the draftsman. Since most new designs aremodifications of previous designs, computer aided systems broughtgenuine benefits.
Unexpected Bottleneck
Meanwhile, new breeds of manufacturing tools were taking hold inmanufacturing departments. New automatic machine tools had computercontrollers that could memorize programs and repeat jobs with unfailingaccuracy. It didn’t take long for these two newly computerizedenvironments to look at each other and see what they could provide toenable greater productivity.

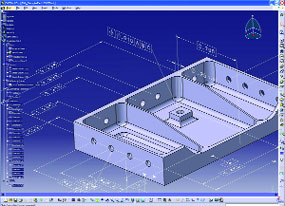
Here is anillustration of a CATIA V5 part showing all of its associated 3D product manufacturinginformation (3D PMI).
If 2D profiles could be effectively exported from computerized designsystems in a way that allowed for the computerized manufacturing systemto read them, then the computerized profiling, milling, and drillingsystems could skip hours of manual programming and would soon build alibrary of frequently manufactured parts, adding up to a massivesavings in time and energy. So design systems began creating programsfor the machine tools. At first, the method used punched paper tapethat was walked from department to department, but then came electroniclinks via RS-232, and it seemed that design and manufacturing wouldsoon become one.

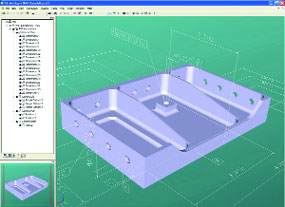
Here, the same CATIA V5 part is shown with all critical PMI having beentranslated by CADverter into UG JT for enterprise wide visualization inViz Mockup.
CAD systems evolved and working in 3D became commonplace as did theability to take machine tool paths from 3D models. The machinesthemselves became more sophisticated, not just in their ability tohandle more complex shapes, but also programmatically changing toolsand working in many axes. The machining center arrived, enabling awhole variety of tasks to be centralized. Even so, manufacturing neededaccess to drawings to establish the exact manufacturing criteria forthe component.
Why? The answer lies in the 3D CAD model, or more correctly, the answerdoes not lie in the model. The drawing contained information likematerial specifications, machining tolerance information, and surfacefinish characteristics, key information that was unavailable in the 3Dmodel. There was no formal standard for storing it, retrieving it, anddisplaying it. The 3D model was actually making things worse.

Enter Standards
There are now signs of a solution. The ASME Y14.41-2003 Product DataDefinition standard covers 3D annotation and dimensions and otherelements of information. These have not traditionally been part of a 3Dmodel, having been normally communicated by 2D drawing, but thisstandard provides a means whereby the 3D model can finally provideproduct manufacturing information (3D PMI), as the capability is beingcalled. This term covers the range of manufacturing information fromstandard text and dimensions to materials specifications and fromsurface finishes to geometric tolerance details.
Yet still things are not necessarily straightforward. Often, differentsystems are deployed within the design and manufacturing departments atthe same company. As a result, it becomes necessary to enable thetranslation of CAD models (and the associated 3D PMI data) betweenthese systems.
Theorem Solutions of Loveland, Ohio, has been working on suchtranslations since the definition of the standard and has sold andinstalled perhaps as many as 40 ASME Y14.41-2003 compliant translatorssince the standard’s publication in 2003. The first of these was aCAD-to-CAD installation, delivering a number of translators thatoperate between I-DEAS and CATIA V5. This configuration has beendeployed at Ford and is currently in productive use supporting thetranslations between various vehicle programs.
The desire to make information available on an enterprise-wide basishas also led to the need for the wider information set of 3D PMI, nowdefined in ASME Y14.41-2003 Product Data Definition standard, to alsobe made available for visualization applications. As an example of thisuse of the extended data set, Theorem has created a customized versionof its standard CATIA V5 to UGS Direct Model (JT) translator. Thisspecial version processes CATIA V5 assembly and geometry data, togetherwith 3D PMI data generated using the CATIA V5 Functional Tolerancingand Annotation application, and translates the data into the UGS JTvisualization format. This customization project has been successfullyimplemented at a U.S. aerospace defense contractor.
Standards are evolving rapidly, and as the various CAD vendors extendtheir support for the creation and migration of 3D PMI data, Theoremwill extend its existing translators to support the translation of thedata.
What was once a major gap in the information flow between design andmanufacturing is now being bridged by the application of ASME Y14.41and integrated translation products. We can expect to see this muchricher information set being made available to engineering departmentsas well as being more widely used within enterprises and throughouttheir supply chains in the years to come.
John Wedrychowski is the business partner manager for TheoremSolutions. He has more than 20 years of experience within the CAD/CAMindustry. You can contact him regarding this article via e-mail sent to[email protected].
Product Information
Theorem Solutions
Loveland, OH
websiteI-deas
UGS
Plano, TX
websiteCATIA V5
Dassault Systemes
Paris, France
website
Subscribe to our FREE magazine, FREE email newsletters or both!
Latest News
About the Author
DE’s editors contribute news and new product announcements to Digital Engineering.
Press releases may be sent to them via [email protected].


